Friday, 12 April 2013

Whirlygig block


Whirlygig for Karen -

Sorry about the blur - having some pic problems the last few days.


Pretty whirlygig blocks are popping up on the hipBees flickr page for Karen's month as Queen Bee.  In my opinion, the magic of the whirlygig block only really happens when the blocks get pieced with others and then they are fabulous!!  I had great fun making a whirlygig quilt last year.  I hope Karen enjoys her whirlies - she has sent out some gorgeous prints to match with her beautiful textured white background.

Hope your quilt is great fun K!


Thursday, 11 April 2013

Making Mountains Out Of Molehills

Urghhh!

I am about to show you two very similar Infinity scarfs.  Can you to spot the differences?


Give yourself a point if you spotted that they're different colours.

Another point if you area able to tell that the lower scarf is lightly narrower than the top one.

And, give yourself five bonus points if you were able to identify that the pink/vanilla one took an hour and a quarter to make while the purpley/magenta one took just 15 mins!!!

Let's just say that what I thought would be a nice little straightforward make became a bit of an exaggerated drama.  I had some difficulty interpreting the tutorial explanation for joining the loop and ended up trying to figure it out from three different tutorials and several blog commentaries.


Lots of head scratching, photo peering and mumbling because one tutorial stated clearly NOT to twist the scarf before joining and yet the pics of another showed a finished scarf with a definite twist in it (like my top photo above).  I followed the first tutorial but found the photographs confusing and ended up with a flat looped scarf.  More head scratching, muttering and some careful unpicking not to destroy or fray the voile fabric and I just did it how I thought it should be done in the first place.  Hooray!  An Infinity scarf with a twist which sits on the neck just as it should!


Cue the making of scarf number two which then took about 15 mins, 10 of which were spent pinning and pressing!

Result! (In spite of my Urghh! moments.)


Wednesday, 10 April 2013

Making Me Smile - 15/52


This week's smile is one of amazement.  The snow has only just disappeared from my garden today after two and a half weeks.  All that time with two feet of snow dumped on top of the newly flowering lenten roses in my front flower bed, and I am stunned that those beauties have survived!  Just look at the hardy wee blighters!  I am delighted that the heavy snow hasn't utterly trashed them.

(I never promised decent photography - sorry.)


Tuesday, 9 April 2013

Sampler Blocks

With 8 blocks already stitched for my MILs birthday quilt, I am finding it increasingly difficult to decide which blocks should be next in my selection.  I'm not sure if it's just that there are so many to choose from, or if it's because I am looking at the finished blocks and trying to ensure that whatever I make next balances out the quilt.  Am I over thinking it?

Anyway, for my next two blocks I chose the Churn Dash Redux - tutorial by Jenna at Sew Happy Geek (really like this one)


 and the Rambler block from 501 Rotary Cut Blocks by Judy Hopkins.


My MIL has been in a rambling group for many years, so I thought including this one would add a little meaning to the quilt for her.  It looks lovely, but it was badly misbehaving in spite of me starching the life out of the fabrics.  It's finished a fraction under 12.5" and I think that the centre square has wonked a little but I'm going to hold on to it and hope that I will be able to make it work when the time comes to make up the quilt top.


I showed you this book before when I made the cushion for my MIL for Christmas and said I would show you the inside of the book, just in case you might be interested in it for yourselves.

I would not recommend this book for beginners as there are no written instructions beyond cutting measurements and diagrammatical construction drawings, but if you have some knowledge of patchwork blocks, then you should be able to follow the construction diagrams without any problems.


All of the blocks in the book are shown in colour diagrams at the front of the book in alphabetical order for ease of reference.


The block instructions are then listed in black and white diagrams with a very handy cutting measurements table which lists the cutting dimensions for various sizes (usually 6) of each finished block.  Really handy if you don't want to do the maths to downscale a block yourself.

There really are 501 traditional block patterns in this book, so it's reasonably good value for money if you like to have block patterns all in one resource.

So, 2 blocks this week means just 2 more to go - guess I'd better start checking out those 501 suggestions!

Sunday, 7 April 2013

Testing Totes


From tomorrow Northern Ireland is introducing a 5p charge for every plastic carrier bag given out in shops.  Now, I do already do my bit by having reusable bags for the weekly shopping and a great Ikea reusable shopper for hiding away in my handbag for those other little errands that get run every week. However, none of those bags are exactly pretty and what sort of a stitcher am I if I don't make myself a cute little tote or two to replace all those incidental plastic bags I acquire?

So this weekend, admittedly feeling a little bereft of any decent sewing time of late, I sneaked in an entire afternoon of playing with tote patterns to get myself ready for the placcy bag tax avoidance scheme!  (Please do not tell my hubby, how many 5ps I would need to spend to recover the cost of these new totes - that's our secret, okay?)

Anyway, just in case you'd like to know, here are the totes I made with my thoughts and a wee link to the patterns (all free online).


First up is the Simple Reversible Totebag from Skip to My Lou.  This is the tutorial that Susan and those other Mouthy Stitches ladies chose for the totebag swap last year.  It's been on my list to try ever since I didn't have a chance to participate in the swap itself.  This is a really nice straightforward tutorial with plenty of pics to support the instructions.  The tote itself appears quite small when finished, but as you can see it is big enough to hold my A4 EPP instructions and quite a bit else thanks to its boxed corners.


Next, I came across a tutorial for a Singlet Style Shopping Bag (think that means 'vest-like' to you and me).  This tutorial is based on making a pattern from an existing grocery store shopping bag and I was intrigued to give this one a go because those grocery bags have great expansion in them, particularly allowing larger flat items to be place in the base.


Of the three bags I made, this one was the trickiest, but only because of a little bit of dexterity required at the finishing of the handles, and it does indeed expand just as you'd expect any plastic grocery store carrier bag to.  It takes quite a bit of fabric to make this because of the folded gusset areas (I'd say you need almost three quarters of a metre of outer fabric and the same again for lining if you are ordering new fabrics).  The tutorial also provides instructions to create and attach a pocket to the bag outer into which the bag can be folded so that it fits conveniently into your handbag or coat pocket but I was lazy and opted not to make it this time.  A wee wraparound strap like the next tote has would be very useful, and if I make another one of these, I will definitely add one.


The final tote is the Compact Groceries Tote by Lisa Lam - this tutorial is available free, but you do have to sign up to the Stitch Craft Create newsletter to access it.  Alternatively, it can be found in Lisa's book A Bag for All Reasons.


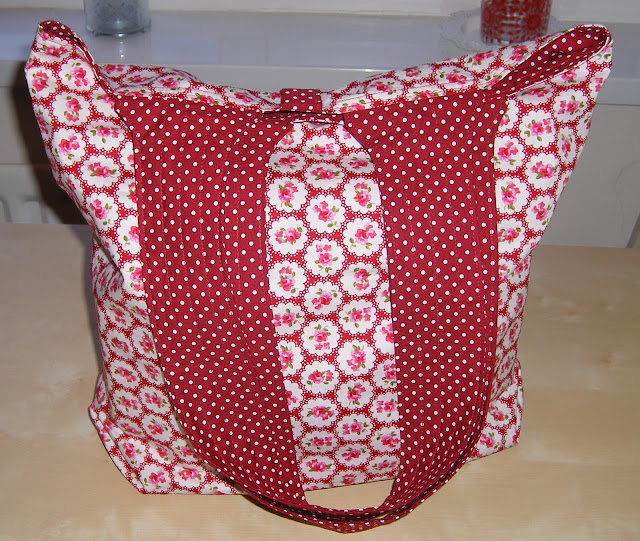
As you can see this tote has a wraparound strap to allow the bag to be wrapped up and slipped into your handbag or the glove compartment of your car.  The pattern suggests attaching popper buttons but I keep forgetting to buy the right kind so I used the sew in ones here and added the red button just for decoration on top of it.  Lisa also added a little loop for a trigger hook which would allow you to clip the bag on to a child's buggy or to your handbag strapping.  I didn't bother with it on my version, but it would be very easily added if you would find it handy to have.  Of the three totes I think this one is probably the biggest overall and I like its generous size, although it is not as wide in the base as the Singlet Style Shopping Bag.

All in all a successful afternoon's tote making!

If you know any other good tote patterns please share them in a comment.  If I get enough, I will collate them and re-post them all in one place for reference.


Bee Blessed Starflowers for April


This month our Bee Blessed Block is the Starflower block.  We have asked for blocks with a coloured solid background (not our usual white) with contrasting scrappy stars.  I think these will look brilliant when they are all gathered together.   Why not have a wee look at the ones already popping up on our flickr page?

Told you they looked good, didn't I?

Given that some of you lovely peeps have already been dashing off your starflowers I thought it was time I got my bum in gear and added my contribution for the month.


I went with green solid and am still waivering as to whether it was a right choice or not.  It was supposed to pick out the green in the two blue prints but I'm not sure that worked quite so well as it did it my head.  Oh well, here they are anyway.

If you fancy joining us and making a block or two to donate to Bee Blessed, there are two different tutorials you can use this month to achieve your 12.5" unfinished block:

Ellison Lane Quilts tutorial very usefully provides the cutting measurements for making two blocks at once.
Modify Tradition has the measurements if you just want to make a single block.

Go on, you know you want to!


Wednesday, 3 April 2013

Making Me Smile - 14/52


We are just back from a lovely long weekend in the South of England where my men competed in the JK International Orienteering Festival (and yes, I froze my bum off waiting for them to finish their races) and a two day whirlwind stopover in London on the way home.  What has really made me smile over the past few days is the pleasure my lovely son has had in seeing the sights of the capital city for the first time.

I have been to London just a few times myself but being with him on his first visit reminded me how amazing it can be to take in all those famous landmarks for yourself.  Frequent "awesomes" were uttered and I lost track of how many times he said "I can't believe I've actually seen Buckingham Palace/Big Ben/Tower of London/Tower Bridge" etc etc.  It was wonderful to share in his first experience of the capital city and I think his age is just perfect for taking in all that he got to see and do. His fascination with the Tube was also unexpected, but after two and a half days nipping from place to place on the Underground, he's now a dab hand at figuring it all out and at balancing while standing in the carriages.  Who knew some of these things would be such a big deal to him?

Anyway, I hope you have all had Easter breaks to cause you to smile too!


PS - I did take the "mystery" EPP with me to while away the waiting hours, but we were much busier than I had expected so I haven't got much to show you on that front yet.  But soon, I hope.  I really hope.
Related Posts Plugin for WordPress, Blogger...