Thursday 27 February 2014

Decipher Your Quilt

she can quilt


Have you heard about Leanne and Jess's new series - Decipher Your Quilt?  Check out the link to find out more and to take their little pre-series questionnaire.  It's very easy and will just take you a couple of minutes to complete.  You can even ask a burning question that Jess and Leanne can incorporate in their series.

They are going to share secrets and tips with us for calculating some quilt maths, deciphering the make up of quilts and the blocks and helping us to know how we can adapt and upscale/downsize the designs to suit our own needs.  These sound like just the kind of useful skills I enjoy assimilating.  The series starts Thursday 6 March - make sure you are following one, if not both of the blogs, so that you don't miss out!

You can find the schedule here to whet your appetite.


Wednesday 26 February 2014

Spiralling Issues

I've been having some spiral quilting issues for the past few days.


Mainly because the new walking foot I had to buy to replace my broken one doesn't allow me to position the guide bar to the left of my needle.  In fairness, I'm not sure that the last one did either in an official sense, but I was able to manipulate it slightly and the guide would stay in place to the left meaning that the bulk of the quilt remained to the left throughout the process rather than having to be crammed, coerced and downright bullied through the not-terribly-large throat of my machine.


The result of the substantial manhandling of this Bee Blessed quilt is that the wonk of the crosses has now been joined by a significant wobble in the spiral.  It's very hard to keep the curve smooth when there's so much hauling going on.  This 70" square looks a little more like a wobbly puddle ripple than I had intended.  Fingers crossed that the washer and dryer will help improve the look before this quilt is passed on for donation.

So, clever peeps out there, I have a sneaky feeling that there must have been a way for me to quilt the spiral with the guide bar to the right of the needle without all of this heartache (shoulder ache and backache too).  Was I doing something wrong?  Could I have helped myself by doing something obvious?  I do have a tendency to make life difficult for myself at times but I started this quilt 6 times and I just cannot see here how I could have changed the process without changing the guide bar position.  Any ideas?  Does your guide bar work both left and right of the needle?  Is this just a quirk of my Janome model that the bar will only sit to the right?  Any helpful suggestions will be gratefully received because I do like to quilt in a spiral but would honestly not want to go through this 'right of the needle' process again!

Sorry if that got a bit technical.  Back to quilts.  

I've stitched up the hipBees concentric box blocks into a flimsy and I really like how it has come together -


Then, I worked on piecing a back from some fun fabric with a ziggy siggy panel down the middle.


So yep, that makes another one basted and ready for quilting - not a spiral though!


Thursday 20 February 2014

Mystery Medallion - Border 4

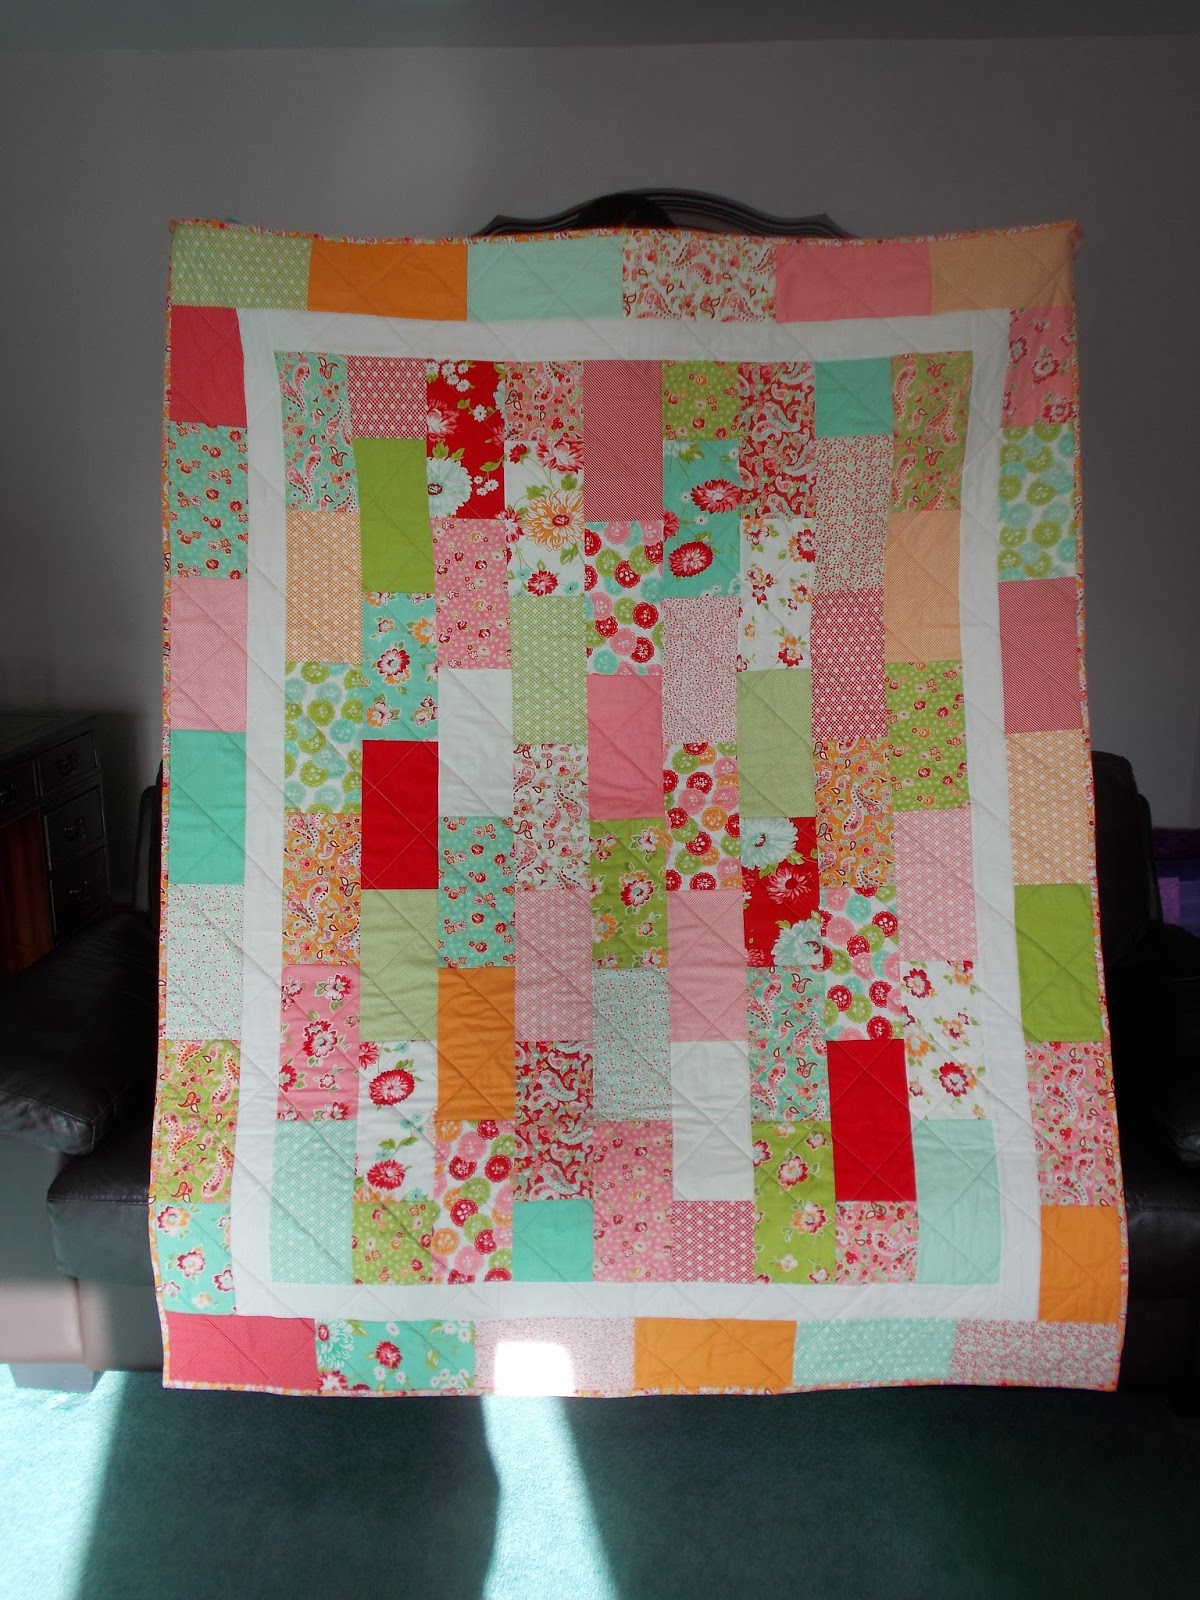
I have been longer than I had anticipated getting back to the Mystery Medallion but here it is as she looks now with border 4 attached.


When I left her last she measured 36.5" square and was looking cute for a baby quilt or wallhanging.  However I knew that I wanted to go bigger.  How much bigger?  Even I don't know yet.  Remember this is the quilt I have not planned in any shape or form other than being a medallion.  But, as a start I felt this border needed to be bigger than the previous ones, so I opted to go 6" wide (finished measurement) this time.

Again the maths would allow for a number of different options if you were working to these measurements but perhaps don't want to use the blocks I've chosen.  For example, working 28 6" (finished) blocks would work perfectly here.

However, I chose to work up some paper pieced tippecanoe blocks and intersperse them with simple bordered rectangles and I am so pleased that it turned out just the way I imagined it in my head!

If you'd like to know,

Here's what I did

Border 4 - bringing unfinished size up to 48.5" square
Make 16 paper pieced 6" (finished) tippecanoe blocks
Make 16 bordered rectangle blocks (block will measure 4.5" x 6.5" unfinished)


For the tippecanoe blocks:
Make 16:  I searched online for a tippecanoe paper piecing template that would give me a 6" block, but I couldn't find one, so I had to draw my own.  It wasn't as bad as it sounds though because I found that papersnake.com has a free downloadable quarter inch grid paper.  This made drafting the quadrants of the tippecanoe very simple, but if you give it a go, just check that the paper prints to exactly quarter inch grids before steaming ahead and stitching up blocks.  Pic below shows how to draw the quadrant with a quarter inch seam allowance if you feel like having a go:


Draw a square 12 x 12 squares on the paper.  This is your 3" block (check the measurement, don't proceed if it's not 3").  The little triangle area marked 1 on the photo is marked across the corner 6 squares along on each of the two adjacent sides.  Drawing lines from these points of the triangle down to the bottom corner of the whole square will give you the sections for 3 and 4 also.  Finally, draw a border of 1 square width all the way around your 3" square and this will give you a quarter inch seam allowance all the way round.  Your entire drawing should now measure 3.5" square.  Hope that made sense.


If you squeeze 4 quadrant patterns on to one page of the papersnake quarter inch grid paper you will be able to photocopy it 16 times to yield the template for your 16 blocks.  To do this you need to draw all the way to the edge of the printed grids as you can see above.  The bottom drawings fit within the gridded paper except for the bottom quarter inch seam, but that's easy enough to draw on manually measuring with a ruler.  Getting four on one page really helps with the photocopying.  I would happily send you a pdf of my template page if you are interested, but I have noted that when I reprint the pdf the sizing seems to reduce so that's not much help. It needs to be exact to work.  Any techie individual know why scanning the template would reduce its sizing like this?

For the bordered rectangles:
Cut 16:  2" x 2.5" rectangles for centres
Cut 32:  2" x 2.5" rectangles for borders
Cut 32:  2" x 6.5" rectangles for borders

Position a tippecanoe block at each corner and alternate 4 bordered rectangle blocks with a further three tippecanoes along each side.


So, now that border 4 is all stitched up I really will have to get my thinking cap on for what comes next.

Don't forget all the "how to's" for this medallion quilt can be found at the top of my blog on the Mystery Medallion Quilt tab.

Tuesday 18 February 2014

Sorting boxes

These boxes have been fun to sort though.  They are the boxy blocks I asked the hipBees to make me back in September when we kicked off our second Bee year.


I sent out packages of black and white fabrics with a few bright scraps and asked for concentric box blocks alternating black and white rounds with occasional pops of colour .


These are the blocks that the Bees buzzed over and sent back to me and this week I've been sorting and rearranging them in the hope of removing them from my WIPs pile soon.


The usual placing, moving, replacing, moving again went on for quite a while until I finally settled on this layout.  My bad pics aren't doing them much justice but they do look great and quite funky together.  So now they've been labelled up in rows and await some stitchy attention in the not too distant future.

Belatedly, thank you hipBee lovelies for all the great blocks!


PS I'm hoping to bring you an update on my Mystery Medallion Quilt very soon - just need a few pics to finish off my post first.

Saturday 15 February 2014

Scrumptious Brick Layer Cake - Big Reveal


It's time to reveal my finished Brick Layer Cake Quilt.  Ta Da!!!!

I've waited for several days to get decent light to take photos of this quilt and I'm afraid this is the best I can do under the dismal weather circumstances.  A quick dash downstairs when the rain stopped at lunchtime.

Still, sunshine or not, she's a beauty!


I used my own layer cake pattern for this quilt - a really good use of the layer cake pre-cut (minimal leftovers/waste), even if I do say so myself.


I even pieced a backing - go me!


Keeping this story real, I should tell you that there was some heartbreak during the quilting stage.  About a fortnight ago I abandoned it mid-quilting and had a bit of a huff on because I was so disappointed with my terrible wibbly lines (when they were supposed to be straight) and was convinced that I had spoiled my precious Scrumptious fabrics with my woeful efforts.  For seven days it hung over the bannisters and I tutted disdainfully every time I walked past it.  I couldn't decide if I should unpick it and redo, but to be honest I wasn't sure a second attempt would result in an improvement.  So on day eight I sucked it up and got stuck back in to finish the crosshatching.  And guess what?  I LOVE this quilt and I don't even mind so much about the wibbles.  

So that's my Brick Layer Cake quilt.  Maybe you might like to try the pattern yourself?  If you ever do, please share a picture with me, I'd love to see it.

Oh, and I do believe that's another tick of my Quarter 1 FAL list.  Hooray!

Friday 14 February 2014

Shouting Out!


Hi Folks! Today I'm doing a big shout out for Little Island Quilting Alison's brilliant quilt drive and block drive for the former street kids of Mexico City.  I mentioned this briefly during the week but today I want to really encourage you to help Alison out.

Please, please hear me out, give it a think over and then stop thinking and stitch - pretty please!!

QAYG blocks for the Soy Amado quilts.


On Christmas Day, Alison and her family visited a home for former Street Kids in Mexico City.  Their stories and the efforts of the home to feed and educate and to provide a place of safety away from the things none of us would ever want our children to encounter, never mind become involved in, tugged at her heart strings.  Her thoughts about her visit are more eloquently explained on her original post here.

The upshot is that she has a vision to provide quilts to this home for former street kids as a reminder that there is love for them in a world where they mightn't always know it.

So, here's the really good news!  YOU CAN HELP.  YES, YOU CAN BE PART OF THESE AMAZING QUILTS.

There are two ways to help:

1.  If you would like to make a finished quilt to send on, you can contact Alison through her blogpost (just leave a comment) and she will give you an address in the Netherlands where it can be posted for onwards transmission to Mexico City.

2.  If you don't have time for a quilt, you can send pre-quilted 12.5" blocks - any kind of block, any colours, just make sure it's 12.5" and already quilted with a backing.  Alison is collecting these herself and doing a sterling job of joining them into cosy covers for the kids.  Again leave her a comment on her blog.


Now, I challenge you all to think laterally about how you can help out in either of these ways:

  • Start from scratch if you like.  
  • Pull three or four handfuls of scraps out of your pile and make up a scrappy logcabin or two (just go for it) - or any other 12.5" block that takes your fancy.
  • Root through your WIPs pile and finish off that quilt you no longer love.  
  • Got a jelly roll or layer cake hanging around that you don't know what to do with? Stitch it together in simple squares or strips and quilt and bind it.
  • Scrounge up the orphan blocks you have at the bottom of your drawers or hiding in bags somewhere and add wadding and a backing and quilt them up.
  • Got a bag full of bee blocks waiting to become a quilt, but you joined so many Bees that you know you should share those potential quilts around before the next set of fun Bee blocks arrive on your doorstep?  Make it up and send it on!
  • Found a pile of fabric and thought - 'what possessed me to buy that?'  Wonder no more, cut it up, stitch it up and let it keep a child warm at night.

Okay, so I don't often do the hard sell here, but I do know that Alison's heart for this project is BIG.  I also know that you are a generous and talented bunch who like a good reason to put needle to fabric, and I know what it is to be blessed on the receiving end of that generous spirit when I posted about the Siblings Together Block Drive last year and when we post Bee Blessed blocks each month. 

So please, please folks, let's show Alison that we support her as she does all this hard work for something close to her heart.  Read her posts and leave her a message so she knows help is coming her way. She'll give you the addresses you need.  

Now I need to stop rambling and give you time to pop over there and to get stitching.

Thank you lovelies!!

Alison's original post is here.
Her post about the QAYG block quilts is here.


Wednesday 12 February 2014

Getting ready

Last night was all about prepping this little lot -


so that I can make 16 of those 6" tippecanoe blocks that you can see on the mat.  Tippecanoe - oh how I love that word!  I find myself randomly repeating it today like some kind of crazy woman, but it just makes me smile.

I'm just about still smiling at the thought of another 60(!) of those wee paper pieced quadrants but still they do come together nicely. Besides, it's been ages since I had some paper piecing fun and my Mystery Medallion Quilt is long overdue some attention having been abandoned rather discourteously so that I could fulfil January's commitments.  The tippecanoes are just part of border number 4.  They will be interspersed with an easy peasy spacing block.  I shall be back with the low down once I get these babies whipped together.  (Do you like how I made it sound like it will take me ten minutes rather than ten hours?)

Just so you know, the fabric has been cut approximately to the sizes required to help me minimise the waste on these pp blocks.  I don't normally work paper piecing this way but I did discover with these in the trial run that some simple cuts can help save wastage of my precious white-with-red prints for future borders.

Don't forget my notes on the Mystery Medallion so far can be found on the tab at the top of the page.


Sloping off now to finish a quilt binding (hopefully).

Tuesday 11 February 2014

Having a wobbler


I had my wobbler with Annabella's blocks for this month's Modern Stitching Bee challenge.  


Annabella asked us to go all Gee's Bend for her blocks, which I am going to be honest and admit I had to Google as I hadn't the foggiest what that meant never mind know where to begin.  But, a myriad of photo examples later I pulled the big girl pants on and threw a wobbler on the cutting mat. (Even if I'm still not entirely sure what Gee's Bend means - improv with curves? or something else?)

Annabella's suggestion was to abandon our rulers in the making of these improv blocks.  Let me tell you, for this rules girl that was SO hard but I did it and by the time I was working on the second block I think I found a groove I didn't know I had!

So, to Annabella - I hope you like your blocks and thank you for pushing me out of my comfort zone and making me learn to make wobbly blocks!  I hope you have a really amazing quilt when all your blocks are in.  Can't wait to see it!

Monday 10 February 2014

Pretty little things


I was a bit secretive about this fabric pull when I added it to my FAL Quarter 1 list last month because I had plans to transform them into birthday pressies for someone with a huge heart.


There was a third fabric tucked behind the others in the top pic and I used the patterns from Judith's frame purse workshop (that I had so much fun at) and used the Dear Stella spot to stitch up a purse lining.


The beautiful yellow geometric flowers became the frame purse outer.  Along with the Oval Elements in gold I used the flowers to stitch a wee neck scarf or bag tie (all neatly folded in the pic above).


 I popped some notecards and a wee crocheted rose brooch inside too as a wee surprise.

Making pretties for friends is the best kind of sewing, don't you think?

Sunday 9 February 2014

For a fab cause


I'm sure you've been reading around Blogland about Little Island Quilting's appeal for quilts for the street children of Mexico City.  While finished quilts are still very much desired for this great cause, there is another way to contribute if you don't have the time for a whole quilt.

When I spotted Leanne's blocks I was delighted to know that quilted blocks are also now being accepted - all the details are here.  Please, if you have an overflowing scrap bin and half an hour to spare or some orphan blocks that you could quilt up, check out this post and get on it.  There are street children in Mexico who need a little comfort and who need a little reminder that there is love for them in a harsh world.

It's Valentine's week people, let's share the love a little!!

Tuesday 4 February 2014

Good Morning Starshine


Mama Bee, Di,  was setting out her orders for pretty blocks this month and sent us all lovely instructions for a block called Starshine.  It's a biggie at 18.5" unfinished but very nice to make.


The Liberty fabrics Di sent are very pretty, especially that green and I think oval elements are always such great mixers (very friendly fabrics if you know what I mean).  The block is a great block but I was a little disappointed that my execution didn't quite make her points twinkle as brightly as my lovely friend Di deserves.  I wonder if she could just squint a little for me when she looks at my block so she might not notice?  ;-)


Saturday 1 February 2014

Bee Blessed - February 2014


Since hearts are everywhere during the month of February, we thought we'd pick up on the theme and have a heart block for this month's Bee Blessed block.


There is a plan to alternate this block in with next month's block (yes, we've been thinking ahead) and fingers crossed the resulting quilts will be just lurrrrve-ly!


Heart Block - 12.5" unfinished

Fabric - please use solid white for the background and a pretty, modern-ish print for the heart.  It doesn't need to be pink but please choose a nice bright shade of colours rather than pastels or dark shades.

Assume scant 0.25" seam throughout.

Fabric A - background (white solid)
Cut 4:  2" squares
Cut 2:  5" squares
Cut 2:  9.5" x 2" border strips
Cut 2:  12.5" x 2" border strips
Note that you may wish to cut your four border strips a little bit larger than specified above if you prefer to have a little more "wiggle room" to bring the block in on size.  You can then trim the block evenly all around to 12.5" when finished.  This should not be necessary if your seams are consistently 0.25" scant.

Fabric B - heart (print)
Cut 2: 9.5" x 5"

1. Draw pencil lines across the diagonal on the reverse of each 2" square and each 5" square.  For stitching, the diagonal lines will be positioned as illustrated on the photograph above.


2. Firstly stitch the 2" squares along the diagonal pencil lines to create the top shaping of the heart.  Then stitch the 5" squares along the diagonal line to create the bottom point of the heart.  The photograph shows clearly how to position these.  Trim away the excess fabric at all the corners leaving a 0.25" seam allowance.


3.  Now press the seams on each half of your heart open.


4.  Place the two halves of the heart right sides together and pin them along the seam which will be the centre line of the heart.  Stitch together.


5.  Again, press the seam open.


It's time to finish off the block with some borders.


6.  Add your border strips by pinning the 9.5" x 2" side strips on first and stitching in place. Press the seams away from the centre.


7.  Now pin the 12.5" x 2" top and bottom borders in place and stitch the seams. Again press the seams away from the centre.


8. If necessary trim evenly all around so that your block measures 12.5" square.

That's it.  Easy peasy, isn't it? Hope you have fun stitching these heart blocks this month.

Thank you!

Related Posts Plugin for WordPress, Blogger...