At first, I didn't think I would join in, but over the next couple of days as life began to change rapidly and my brain went into overload thinking about what was going to happen with our health and schools and A-level exams and university applications and primary school applications and therapy support and work and our planned house move and ... and ... and ... , I realised I could really use the discipline of something that would just take a little bit of time (or more if I wanted) each day to help me breathe out and not be entirely consumed by the uncertainties of that present.

I'm not sure if Sarah and Penny will ever know what a blessing it was for me to be able to divert my head for a little while in those earliest days of Lockdown. Their idea helped me maintain at least a modicum of sanity, and for that inspiration I will be forever grateful. Thank you, lovely ladies.
So, the plan was this. Sarah suggested we draw a grid with a mixture of squares and rectangles measuring everything from 1" square upwards, and daily add whatever kind of stitching we fancied - embroidery, appliqué, EPP, little bits of lace, precious buttons, whatever - to create a stitchy sampler.
In spite of all my sewing supplies and equipment being in packing boxes, it wasn't hard to lay my hands on this half metre of Essex Linen in berry and my embroidery threads and button jar. I traced the lovely text script Sarah so kindly provided as a starting point for those who wanted it and so began my journey with the #sewalittlehappinesseveryday embroidery sampler.
This was a perfect start to a project that I had absolutely no plan for! I'd drawn my grid a little smaller than Sarah's 20" x 20" - mine was just 17" square to fit the available height of my fabric. But there still seemed like an awful lot of little spaces to be filled!
But, this was a day at a time thing - it's all it was meant to be and all I could actually have coped with in all honesty. So, that's what I did, moved forward one day at a time with no plan.
There were days when I took an opportunity to stitch elements of other designs and patterns I'd always wanted to try but probably would never tackle the whole of. I really enjoyed doing that! These 'Hope', "Faith" and (further down) "Family" designs are from the free
Words of Life stitch-along by
Jenny of Elefantz and I was so pleased to choose these words to include on my sampler grid. Thank you Jenny for such pretty designs. That appliqué was a lot smaller and more challenging than I had imagined, but I did it!
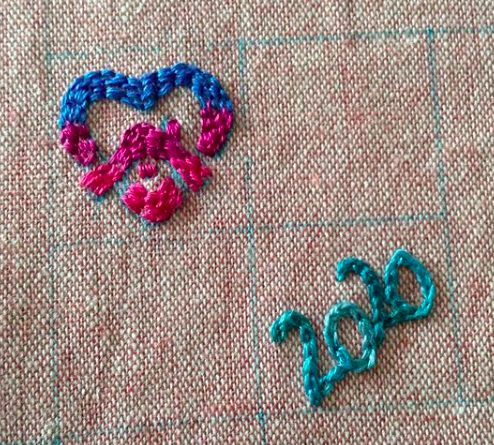
All the while this #sewalittlehappinesseveryday project is going on there's a wealth of inspiration from other stitchers on the IG hashtag. One lovely stitcher mentioned that she was adding a little stitchy social history reference to this time on her grid. This great idea percolated for a few days and then I included my own drawn version of the Stay Home icon I'd seen on social media (the little heart and house thing up there) and of course, the year - not that we're likely to forget it anytime soon.
I loved adding my favourite mother of pearl heart buttons alongside little floral sprigs and daisies I drew.
When it came to filling the largest square on my grid (6") I English Paper pieced some hexies and appliquéd them on. They were a lacking a little something so I finished them off with a border of tiny french knots.
Again choosing more inspiration from books/designs I am unlikely ever to manage all of, I tried three of these little medallion motifs from Yumiko Higuchi's lovely book Embroidered Botanicals. These definitely challenged my skills, which is why I'm only showing you one of them close up ;-) If I remember correctly that's all stitched in a 2" grid square!
One day inspiration came from an ad I caught on FB for the Flow Hive - it's a very interesting Bee Hive design. So, I decided to draw a bee and a hive (nothing like Flow Hive, I may add). I also tried dense french knots but kind of regretted it as it takes a LOT of french knots to cover even a 2" square.
More buttons weren't just pretty, they were speedy additions on busier days.
And then, at the weekends I sometimes indulged in more complex stitching like this paisley motif from Carina Envoldsen's book Mandalas to Embroider.
Over the days and weeks this random collection of stitching ideas gradually filled up the grid spaces.
I was very proud of myself for drawing this pretty birdhouse and managing the stitches. I do wonder if I shouldn't have chosen darker threads though as it fades into the background on the finished grid. But, it was one day at a time, evolving without a particular plan.
I also tried some new to me stitches that I was picking up on another embroidery sew along I joined, too (more on that another day). Above is a fly stitch leaf
and here's a hollyhock vine of buttonhole wheels. I need more practice at these!
If you've made it this far in my post, I congratulate you. You may, by now, be feeling like you sat through Lockdown with me!! As you can see, I didn't show you everything up close, but here it all is in its finished, but not quite complete, glory.
This project is an eclectic mix/mess of technique, designs, and colour and it's become incredibly special to me in its lovely imperfection. Oddly, it's a reminder of a time I'd rather forget, but it will also ever be a reminder that creative expression is a therapy in my life and that there is a community of stitchers who seek to help us tap into our creative diversions when times are tough. Thank you!
I think I have decided that this should become a wallhanging. Perhaps this week I'll get a chance to bind it ready for display?