Tuesday 29 October 2019

Quilting Retreat - Oct 2019

Last weekend I had a fantastic break at Just Jude Designs inaugural Quilting Retreat.  I wish I could be doing it all again this weekend, though I'm not entirely sure I'd have the stamina!


Judith chose a really beautiful venue for her retreat in Dundrum.  Sited on a National Trust reserve on Keel Point, Dundrum, we stayed in the very comfortable manor house (if that's the correct way to describe it) of Murlough House.  The inside of the house was just gorgeous, and we were made to feel very welcome by the staff custodians of the house.  Our sewing space was located in a hall behind the house, and was a great hub of activity all weekend.


As you can see, after settling in to our very comfortable accommodation and eating a most satisfying evening meal (fab food all weekend), we wasted no time claiming a sewing station each and plugging in those machines.  Whirr, whirr, whirr.

Prior to this retreat, I spent time prepping two quilts for stitching and progressing three of my WIPS to their binding stage.  I also cut fabric for another small project, just in case I should have time.  It really was time well spent because it helped me to have a very productive weekend.


My Friday night effort resulted in a completed Giant Star flimsy.  I'm not superwoman - remember, I took blocks already cut and HSTs made, but I did stitch like the wind and got them all together and bordered before I faded away to bed at 22.50.  So much for my dreams of sewing 'til midnight!


I managed to nab a happy (but tired) pic of the main lady herself, Judith, and me just before bed on Friday night.  It may have been the only 30 seconds she was able to stand still all weekend. She's a superstar and made a lot of sewing enthusiasts happy and inspired this weekend.


We were all eager beavers again on Saturday morning and I managed another pre-cut quilt between the morning and the afternoon free sewing sessions.


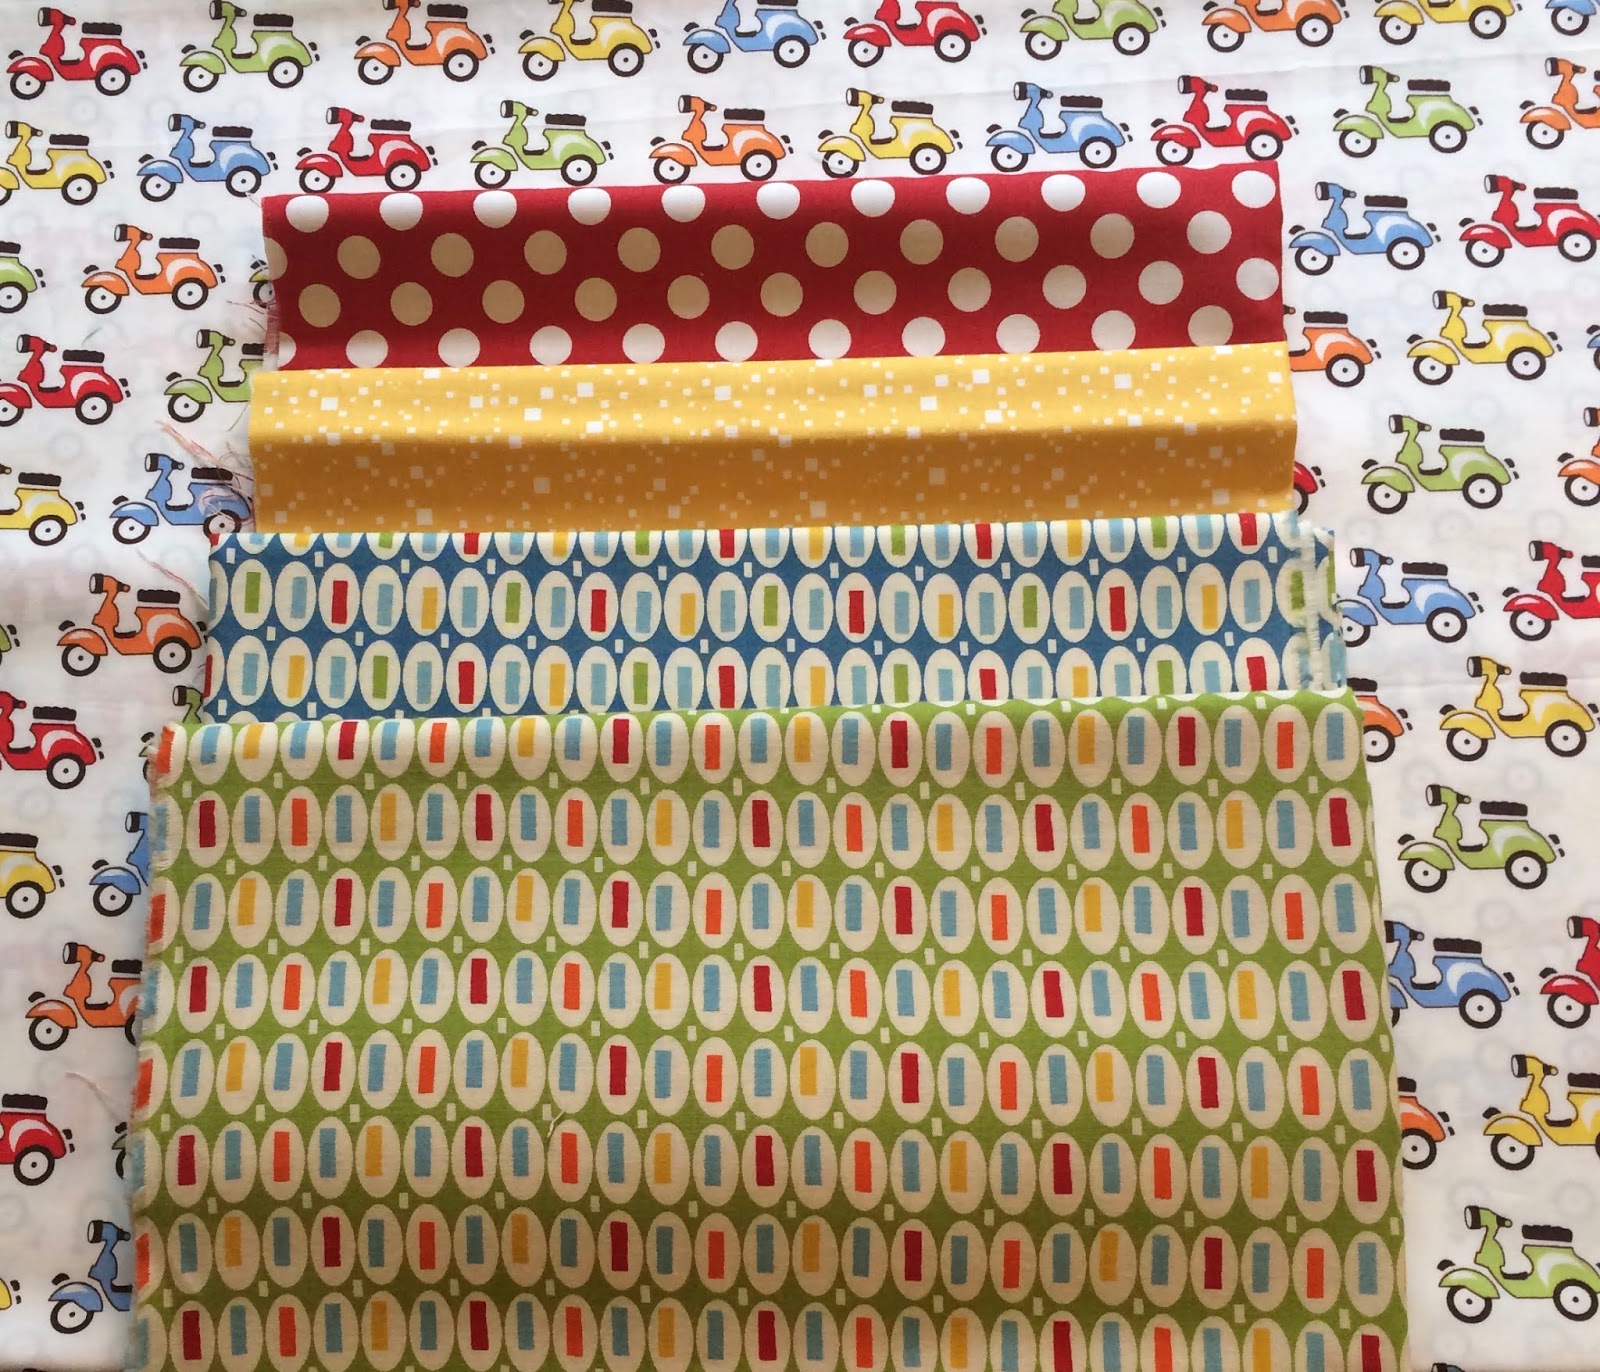
This one is a reduced size Moda Love Layer Cake quilt.

I'm hoping that in a few weeks' time at home I can pick up on these two quilts again and progress them gradually towards finishes.  If I can manage that sometime around Christmas/New year I would like to donate them to CT's Pre-school or perhaps the charities she is supported by so they can raise a little money perhaps by auctioning or raffling off.


We had a fun pincushion swap on retreat (as well as a rather animated game of sewing Bingo and a block race for some charity quilt blocks - but I forgot to get a pic of those).  There was much oohing and aahing as pincushions were passed over to their recipient and revealed to a nosy congregation of expectant retreaters.


This was the pincushion I made and swapped with the lovely Janet.  I've blogged about it separately here.


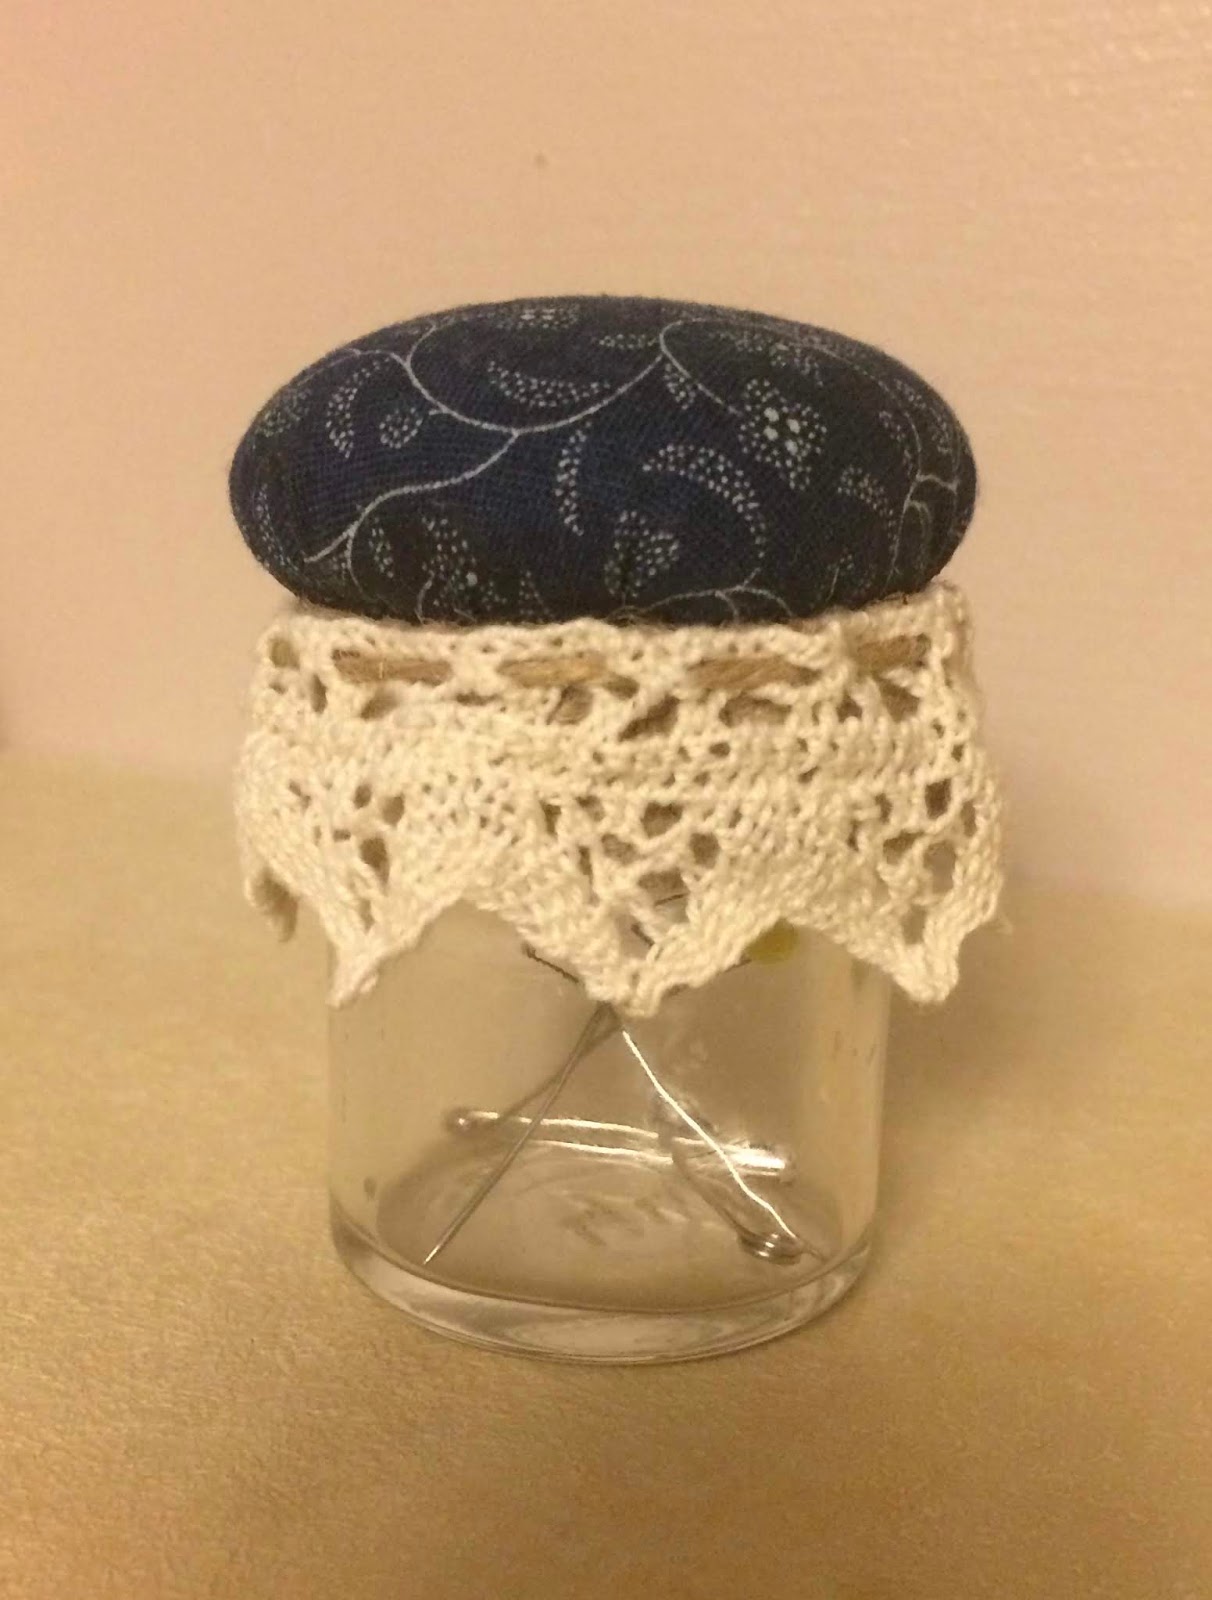
Rather coincidentally, the luck of the draw then revealed that Janet was to share her pincushion make with me.  Isn't it sweet?  There's no sense of scale from my bad photograph but it's a weeny little jam jar with pincushion topper.  I'm thinking this would be very handy for applique stitching when I could pop my appliqué threads (which I keep on bobbins) into the little jar beneath the pincushion.


Once my two quilt tops were pieced, I moved on to binding three projects I brought already quilted.  My Countdown to Christmas panel didn't take very long at all.


The strippy heart wallhanging makes me smile every time I unfold it and I love the aqua binding.  I so often choose red binding for my Bonnie and Camille quilts, but opted for this one for a change.


I also bound this 28" square mini-quilt which I'll tell you about another time.


And THEN, on Sunday morning I stitched up a fabric basket, an enlarged version of the Pink Penguin Fabric Basket tutorial.  It's been a long time since I made a fabric basket.  I had forgotten how satisfying they are to complete.

Phew, that was a lot of stitching! I am convinced that it was being well prepared for this retreat that allowed me to tick off so much of my to do list.  It was a very helpful way to maximise machine time which I don't always get at home, and move closer to proper finishes on three of my WIPs.  A little bit of hand stitching on the binding and that should be sorted soon, I hope.

Our wonderful accommodation for the weekend allowed us the opportunity to wind down in more ways than just stitching.  The house had lovely resting space in lounges and little seating areas, beautiful gardens and, right on the doorstep, a beach with a view of the Mourne Mountains - yes, those that sweep down to the sea. See?


Having a pre-breakfast walk on the beach with friends was a soul refreshing way to start both days of doing what I really love.  What an indulgent weekend!


Sunday morning's sunrise was warm and stunning.


And, of course, retreat was a time for catching up with friends, some new and some of whom I haven't seen for too long.

Can you tell that I loved EVERY MINUTE of my October retreat weekend?  I truly didn't want it to end.  Thank you so much Judith for creating a restorative and inspiring weekend for us all.  You worked your socks off to make sure everybody was happy - can't thank you enough.


Sunday 27 October 2019

Pincushion Swap

I've been away at Quilting Retreat hosted by Just Jude Designs this weekend, and, oh my word, how fabulous it has been!!  I promise to tell you more about it soon, but for now let me tell you about my contribution to the pincushion swap.

I've been pinning pincushions to my Pinterest board since I knew this was happening and had quite an overload of ideas for a while.  I wanted to try so many things that I'd seen, but still wanted to do something a wee bit different, too.


While I pondered, I made a pincushion in the style of Fabric Mutt's Deluxe Pincushion design.  I loved it and was going to keep it but gave it away to someone who loved it just as much.  It's heartwarming to give to someone who loves a thing, isn't it?


This practice pinnie was great for getting my brain to think around how to execute some of the ideas weaving about in my head, so I started drafting and calculating and came up with a plan.  With fingers tightly crossed, I gave it a whirl, and ended up with this to swap -


One of my ideas was to try to include an area for needles as well as pins.  I don't know about you, but when I pop needles into my pincushions I can't distinguish them easily from the pins (middle aged eyesight probably), so I end up hunting around for one usually to discover it disappeared inside the pincushion months ago!  I thought a little felt needle landing would be a nice inclusion so the needles have their own dedicated space.

Aware of the popularity of Wonder Clips of late, I made a little clip tab as well.  I know it only holds 3 or 4 but that's enough to deal with a 'hold it together emergency' while you hunt out your pouch of wonder clips for the rest. 

I loved the idea of a scissor pocket like the one on the Fabric Mutt design, so I wanted to have one of those too.  And, of course, some actual space for sticking pins!

The tallest part of all that order was getting all of the elements to fit in a pincushion that wouldn't come out measuring 12" square.  It did take some puzzling and a few drafts and re-calculations to achieve the resulting pincushion which measures approx 5" x 6.5".

Fabric-wise I chose some reliably pretty Bonnie and Camille prints with the addition of a little lace trim and mother of pearl heart shaped button. 


The backing is Essex linen in natural (right pincushion in pic above).  I attempted to get the gorgeous texture of matchstick quilting that one of my old pincushions has (the one on the left).  I've always felt that texture has really helped the pincushion's hardiness and it's also just lovely and tactile.  But for some reason, it just didn't really work on the Essex linen.  I don't quite know why, but it's definitely very flat compared with the older pincushion back.  Aw well, you win some ...


As you can see, I also incorporated one of Carina Envoldsen's teeny mandala embroidery designs in the pin part of the pincushion.  I had enjoyed a few stitchy hours working up this mandala on my holidays but didn't quite know how I wanted to use it.  When it came time to think about this pincushion swap I wracked my brains as to what to feature on the pin area and I almost went with a downsized quilt block design. Fortuitously, when rooting around my sewing pile for something unrelated, I came across the mandala again and thought it might be nice to try to work it into the pincushion design.  A little porthole worked beautifully in the pink scallop design fabric and the embroidery popped neatly in behind there.

Next time all I would do differently is make the scissor pocket just a little bit taller (and perhaps add something more reinforcing in the bottom of the pocket).  Other than that I'm rather pleased with the resulting pincushion and hope the swapee who received it is too.

Tuesday 22 October 2019

Quilty Textured Bliss - Strippy Heart Wallhanging


I've been on a bit of a mission to bring some of my WIPs almost to completion so that I can take them away with me to retreat at the end of the week and get them bound, ready to bring home again and finish on the sofa on these dark nights.

I'm thrilled to report that this one will definitely be making it to Dundrum with me for some binding attention!


I opted to quilt this straight lines which should be ¼" either side of the seam.  In reality they are anything but.  I promise no alcohol was consumed prior to quilting but I just could not hold those lines straight at all.  I'm going to blame the multitude of seams for making it 'bumpy' ;-)


Regardless of my rather dubious quilting (which you can see for yourself above), the result is a fabulously textured wallhanging in waiting.  I really love how it looks and feels!


This quilt was not very square when I went to trim it back after quilting.  I don't usually have much trimming to do on my quilts but I found this one, and it's bigger sister, were bit a bit 'out' when finished quilting.  I wonder is it to do with it being made of so many strips, rather than blocks?  I think maybe a bit of a wave happens when working in strippy pieces, but maybe I'm just making excuses for my inaccurate piecing.  I did eventually trim away a fair bit to achieve something squared off, so I'm hoping it will look alright when actually (eventually) on a wall.

I'm very excited to be so close to a finish now!


Sunday 20 October 2019

Moda Love Layer Cake Prep


Um, yes, this is yet another quilt in preparation.  This one is going to be a Moda Love Layer Cake Quilt, though I'm making it from 7.5" squares and HSTs rather than 9.5" squares as the pattern and Layer Cakes lend themselves.  With a little border to prevent loss of the star points in my binding I should end up with a quilt measuring 60" square.

In defence of this new start and the Giant Star I showed you being prepped last week, I have a retreat weekend coming up and I really want to make these two quilts to donate to CT's pre-school/support groups so they can raise some money from them.  So, yet again I'm allowing common sense to be overruled and will hopefully come home from retreat with two quilt tops ready for basting.


This layout has been shuffled so many times I think my eyes may have lasting damage!  It has been tricky to get a balance but I think there's always going to be a glut of reds especially since the Little Ruby Layer Cake was a little shorter on green and pinks.  I'm now at the point where every move I try affects something else, so this is the layout for better or worse.

This will be my second reduced size Moda Love Layer Cake (first one here) - one day I will make a full sized version because it is such a fab pattern!

Sunday 13 October 2019

Scooters and Stars


I've had this fabric set aside in a bundle since before CT was born (she's 4 now), and I think in all that time I've planned about 10 different quilts for 10 different reasons for it.  Mainly, the bundle grew up around the background scooter fabric which I bought just because it was fun.  There were a few other fabrics in the mix but my new plan for the fabrics has whittled it down to these initially.


Time to make a Giant Star quilt!!

Using the In Colour Order tutorial (but adjusting my sizes to suit the sizes of my fabric pieces) I have cut this fun Giant Star.  I'm really looking forward to working on it.  It might be one of the projects I take along to retreat in a few weeks' time.  Giving myself options.  You know, because I don't have enough WIPs to choose from already ;-)

ETA - I've just read this published post and noticed my glaring mistake!  I need to remember to re-order those red and green star points in the top left corner before I stitch them up - what a numpty!!


Sunday 6 October 2019

Strippy Heart Wallhanging


My forgotten projects find in late July uncovered this packed up wallhanging that I started some time back in the early months of this year.  I was inspired by the Strippy Heart Quilt I made for my friend and thought it might be nice to try a reduced size version as a wallhanging.


It could possibly be the insanity of working in scrappy 1.5" widths that resulted in it being tidied away and overlooked for a number of months, but I have been scrapping away at it and have made some progress since the pic above.

See?


Unlike the bigger quilt, I made this one piece by piece (the large quilt was made from rolls of fabric I'd stitched up - you need to see my post to understand what I mean).  I think it has meant for more overthinking the placement of each piece though, which was avoided by using the rolls method of the bigger quilt.  Perhaps, coupled with the fact that I have way less pink, navy and green B&C fabrics than the reds and aquas and I was trying to balance everything out - but, yes, I probably overthought it.  

So amid an explosion of B&C scraps I have made progress and my questionable sanity is relieved by how much I like the results.  Just need to keep a bit of momentum if I can so that I can get this flimsy ready for basting and quilting soon.
Related Posts Plugin for WordPress, Blogger...