

You may recall that back at the end of August I posted my fabric scrap rolls which I said were destined to become a crocheted rag rug just because I've always fancied having a go at one really, and it would use up those skinny strips I otherwise don't have a scrappy purpose for.
I would really like my rug to be oval (or probably more correctly a rectangle with rounded ends) but it is surprisingly difficult to track down a tutorial for one online. The one I did find started out well -

I posted my late night pic on IG and had lots of kind admirers. I think the random scrappiness of the fabrics caught folks' attention. Then about 2 rounds later none of the counting seemed to be right, the increases for the rounded end were coming in the middle of the straight side and I just didn't know where I'd gone wrong. I took a few rounds out and was meticulous this time but same issue repeated. Clearly this pattern and I were having communication issues.
So, I ripped it back and tried another pattern for oval crochet and ended up with this wavy thing. A little online research suggested that the waviness was due to too many increases for the curved ends, so continuing with this pattern was only going to compound the problem round by round. Needed a different approach, so I left this one aside and picked up a new fabric roll.

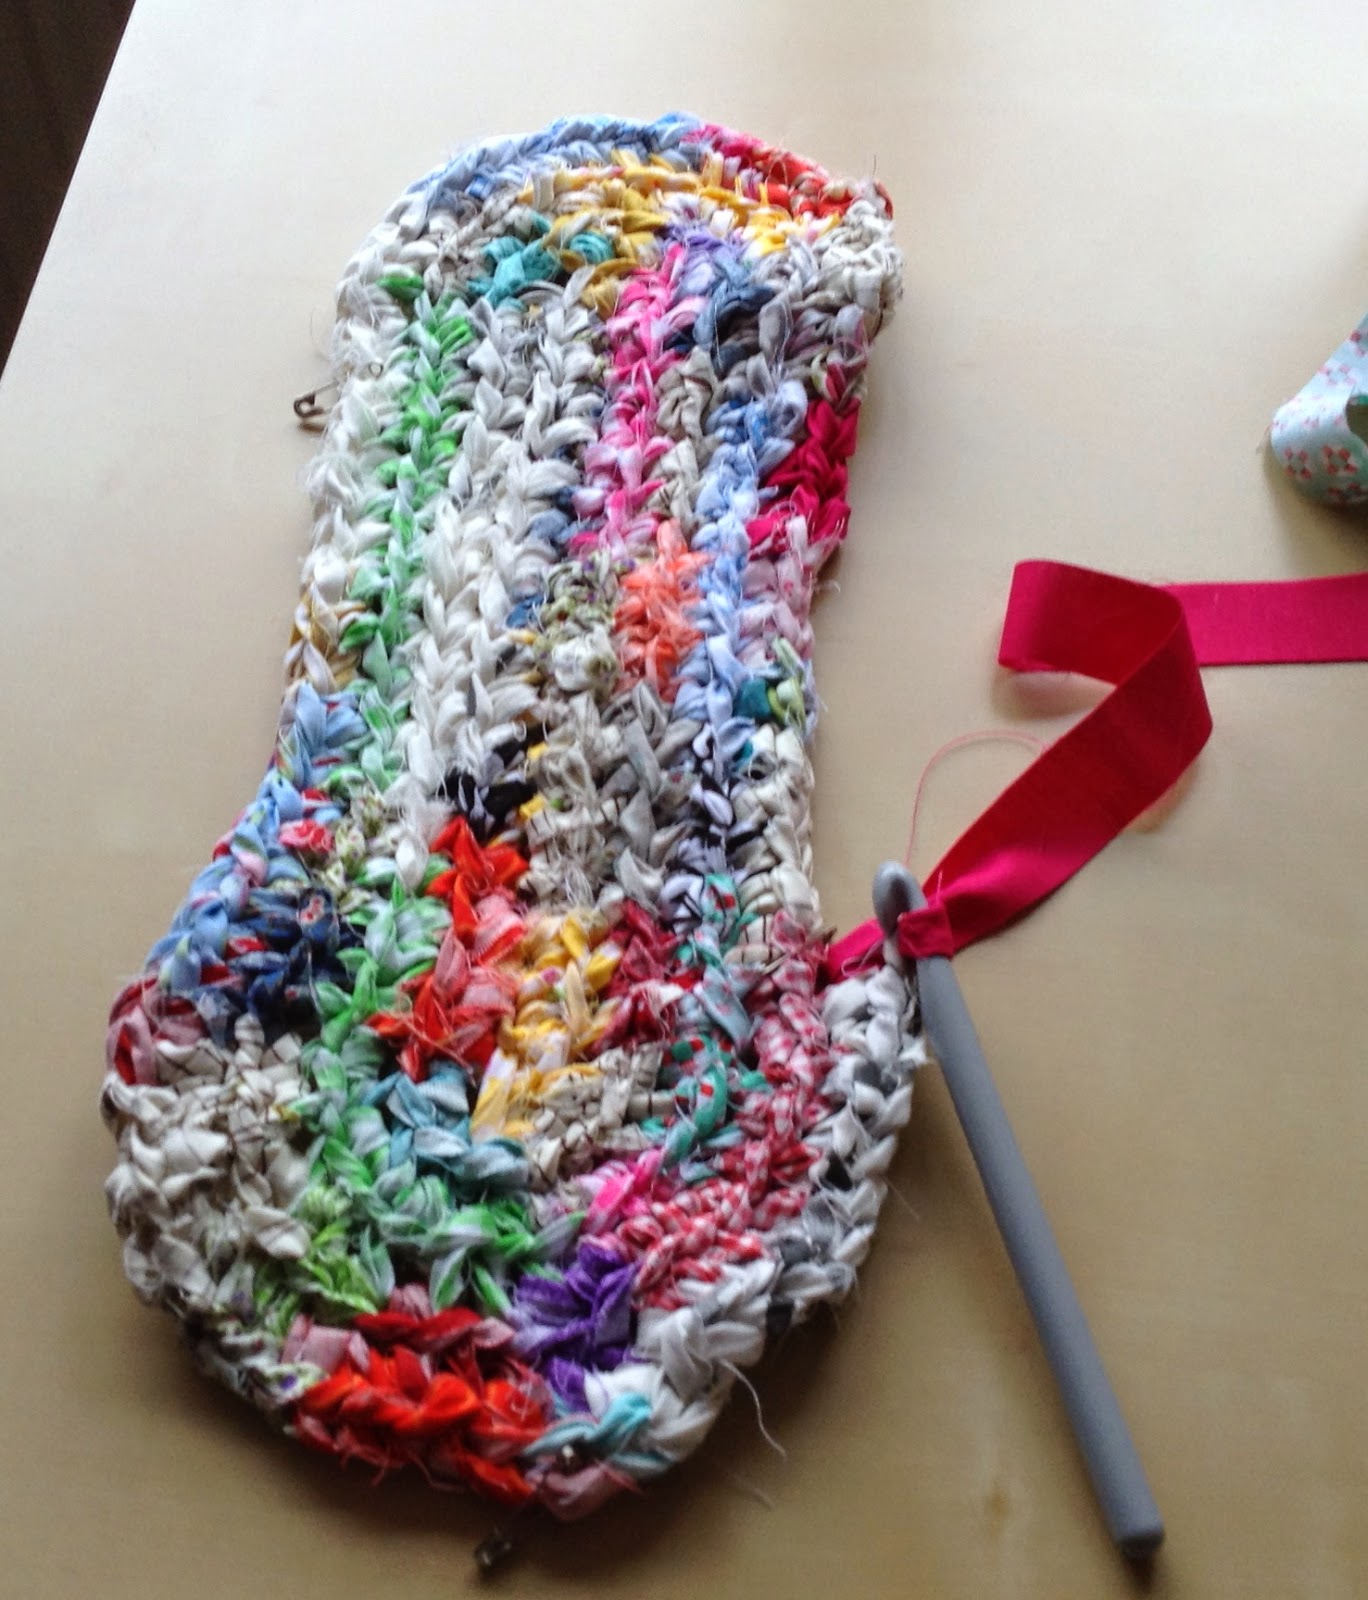
Attempt no 3 is looking much better! Basically, I am now working it out as I go along. I've been a diligent little bunny and am painstakingly applying the principles I noticed in the original patterns to my own counting and it seems to be working so far. I've used basting pins to mark the beginnings of the each curved section and each straight section (helps a lot with all the counting involved) and a basting pin with wool tail over there in the curved pink gingham end to help me identify the slip stitch at the end of each row which I am NOT supposed to work into (but did several times). I seem to be getting there, though oval crochet advice hereforward suggests I need to start randomising the placement of the increase around the curved ends to avoid a half hexagon look. Not sure how good I'll be at "randomising" but I'll give it a go in the name of crocheted rag rug happiness!!

I've had a few questions about my fabric rolls on IG, so thought I'd just quickly recap here. My strips are all 1" wide lengths of leftovers that were too small for any other scrappy purpose. From my reading I know folks have used strips as small as 0.5" wide too. Not sure how wide they've gone but I wouldn't really like to be much wider than the 1" myself.

Initially, I did try joining them at an angle like you do with binding, but this rug isn't a precision thing, so straight seams aren't going to be an issue, and they're much quicker than the angled ones! When I'm coming to the end of a roll while crocheting, I can just stitch the end of the last strip to the starter strip of a new roll (unless I want to join as you would normal yarn and bury the tail ends as I go). Not much to it all really.
Back in April I had a whole bin full of 1" strips to work through which suited that time but I wouldn't necessarily want to face them in this marathon way again. If I trim the strips to 1" as I am tidying away other projects and sew them together a few every now and then my rolls could gather gradually.

So, there you have it, the beginning of my rag rug adventure. Wish me well with the continuation of the pattern, I REALLY want this to work.

Looks brill so far, and the rag rolls look so yummy too!
ReplyDeleteKeep going, it looks fabulous!
ReplyDeleteLooking good Sarah! you may need to publish that pattern when you have it all worked out.
ReplyDeleteFun idea, and it's looking great!
ReplyDeleteRemember that it is a rug too, it will get stood on which will sort out some of the not quite perfect spots. It is looking good to me.
ReplyDeleteyou are certainly persevering at this challenge, I think it is rather nice the shade it is becoming, will certainly be an origional
ReplyDeleteGreat start :)
ReplyDeleteooooo you are just so organised, I love it. Check out those cute little rolls of 1" strips that must have taken hours to sew together. And this rug is going to be fab - if you did a tutorial I'd have a go x
ReplyDeleteIt's going to be wonderful!
ReplyDelete