Showing posts with label crochet. Show all posts

Saturday, 16 March 2019

Little Virus Shawl


I've been intrigued for some time by the crocheted virus shawls that I see popping up on my Pinterest and IG feeds. In a classic case of avoidance, I used the tediousness of unpicking the quilting on DS's quilt as my excuse to start one.  Makes no logical sense whatsoever, of course, but never mind.

I'm not a very experienced crocheter by any means.  At most, I dabble here and there and stick to relatively uncomplicated things.  I think crochet is all about getting the flow of the pattern in my head.  If I can't get that, then I'm stuck trying to remember which number on which line of the pattern I'm supposed to be at and spend more time counting and re-counting than stitching.

I'm happy to say that with a little help from two sets of UK terminology instructions (24 Carat Crochet and straightcurves.co.ukhttps://www.straightcurves.co.uk/community/crochet-virus-shawl-uk-translation/) and an incredibly helpful video by Bella Coco on Youtube, I did manage to find the flow, to understand where the pattern was going, and I really enjoyed the stitchy 4 row repeat that grew my virus scarf (not really big enough to call a shawl) relatively quickly.


Once stitched, I rinsed the scarf through in some warm water, squeezed out the excess (don't wring it!) and pinned it out on a towel on my bedroom floor to block it.  The hardest part of this process now, is just finding a time when and a space where CT cannot access it (or the pins) while it's drying!


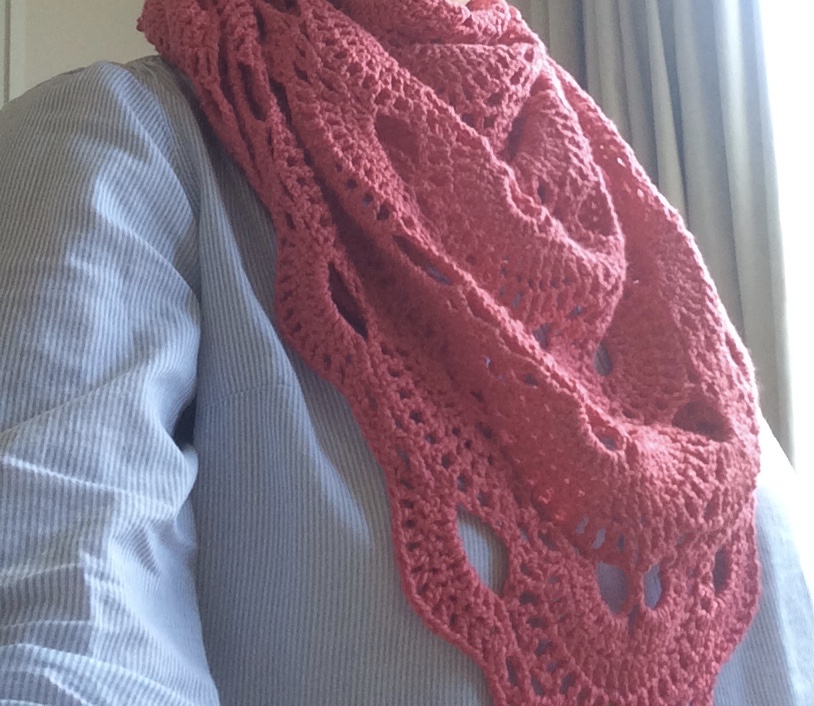
Ta da, I now have a gorgeously soft virus scarf for the spring - although it currently feels like spring was that week two weeks ago when we had three days of warm air, and now we are back to winter.


I wish I could capture the colour of this yarn for you, but it is impossible to get it right.  Most of these pics looks like hot neon pink instead of the more coral shade it really is.  I think it was called geranium.  It is so very soft and not even the teeniest bit itchy.  I REALLY struggle not to itch with fibres on my neck or arms and lost interest in knitting and crocheting in my twenties because I could never wear anything I stitched!  I live in hope that gorgeous yarns won't make me want to scratch all day, but with little success.  I'm finding that really I need to stick to cotton or acrylic yarns and rarely can I get away with any wool content at all.


This yarn is Stylecraft Malabar which is a blend of cotton 78% and silk 22% and I adore the feel of it.  Being cotton, I'm not sure how warm it would be for a winter scarf/shawl but with just two balls, I've stitched up a decent sized neck scarf for the spring/early summer.  It's a DK weight yarn and I worked it up in a 4mm hook, though I suspect I would have achieved a drapier feel if I'd gone up a hook size.


Next time I crochet a virus shawl I really would like to keep going and make it a proper shawl size.  From what I read most folks are suggesting it takes between 500g and 800g of yarn for that size.  I will need to think carefully what yarn I could use so that it won't itch and be relegated to the non-wearable pile.  I also definitely want to use a variegated or colour changing yarn next time.  It's the only regret I have about the little scarf but I was just using up a couple of balls I had in my box, so that's ok.

Well, that was an itch well and truly scratched (pardon my pun). Only now I'm trying to figure out what excuse I can come up with for starting a shawl sized version when I have still two other long term/large crochet projects on my WIPs list. Hmmm ...


Tuesday, 9 February 2016

Cutting it fine


I was cutting it fine last week trying to finish up a crocheted shawl for a birthday pressie.  I honestly didn't think I'd make it but on Thursday night I was sewing in the yarn ends and wrapping and packing for an early trip to the Post Office on Friday.  Then it was up to first class mail to do its bit while I crossed my fingers.


So now that it has been received I can show you this Elise Shawl.  I found the free pattern on Ravelry.  It crocheted up a treat and overall really wouldn't take you too long if you remained focussed.  Unfortunately, I didn't.  Hence the 'cutting it fine', in spite of having started in plenty of time really.

This shawl is only little, making a neck scarf size, but you could easily just keep the pattern going with no need to recalculate the written instructions, other than the need for a little more yarn if you wanted a larger shawl.


When I had finished the stitches I admit that I was worried that I ought to have gone a few rows more to make it bigger but then I blocked it and that was like magic.  Truly.  I was amazed how much bigger blocking it and opening out the stitch pattern made the whole piece.

I am certainly no pro at any of this (as the mistakes in the crochet will testify) but the mystery of blocking was debunked somewhere during my Christmas googling time.  All I did was soak the shawl in some lukewarm water with a tiny bit of mild detergent for 15 mins.  Then I squeezed out the water gently being careful not to wring the fibres. So, just squeeze, don't twist or pull.  After that I laid out a bath towel on the living room floor and pinned the shawl out as neatly as I could.  Next morning, the shawl was nice and dry and when I took the pins away it looked like a beautiful piece of lace which it most definitely hadn't when it came off the hook.  Hooray for blocking!

I would definitely recommend the Elise Shawl pattern if you fancy making a simple, pretty shawl.  One day I hope I'll get time to hook one up for myself, but for now I'm happy that my lovely friend liked her birthday present.


Wednesday, 25 June 2014

Crocheted Rag Rug - Beginning of a journey


You may recall that back at the end of August I posted my fabric scrap rolls which I said were destined to become a crocheted rag rug just because I've always fancied having a go at one really, and it would use up those skinny strips I otherwise don't have a scrappy purpose for.

I would really like my rug to be oval (or probably more correctly a rectangle with rounded ends) but it is surprisingly difficult to track down a tutorial for one online.  The one I did find started out well -


I posted my late night pic on IG and had lots of kind admirers.  I think the random scrappiness of the fabrics caught folks' attention.  Then about 2 rounds later none of the counting seemed to be right, the increases for the rounded end were coming in the middle of the straight side and I just didn't know where I'd gone wrong.  I took a few rounds out and was meticulous this time but same issue repeated.  Clearly this pattern and I were having communication issues.


So, I ripped it back and tried another pattern for oval crochet and ended up with this wavy thing.  A little online research suggested that the waviness was due to too many increases for the curved ends, so continuing with this pattern was only going to compound the problem round by round.  Needed a different approach, so I left this one aside and picked up a new fabric roll.


Attempt no 3 is looking much better!  Basically, I am now working it out as I go along.  I've been a diligent little bunny and am painstakingly applying the principles I noticed in the original patterns to my own counting and it seems to be working so far.  I've used basting pins to mark the beginnings of the each curved section and each straight section (helps a lot with all the counting involved) and a basting pin with wool tail over there in the curved pink gingham end to help me identify the slip stitch at the end of each row which I am NOT supposed to work into (but did several times).  I seem to be getting there, though oval crochet advice hereforward suggests I need to start randomising the placement of the increase around the curved ends to avoid a half hexagon look.  Not sure how good I'll be at "randomising" but I'll give it a go in the name of crocheted rag rug happiness!!


I've had a few questions about my fabric rolls on IG, so thought I'd just quickly recap here.  My strips are all 1" wide lengths of leftovers that were too small for any other scrappy purpose.  From my reading I know folks have used strips as small as 0.5" wide too.  Not sure how wide they've gone but I wouldn't really like to be much wider than the 1" myself.


Making up the rolls is fairly mindless.  I simply stitched the strips together with a straight 0.25" seam allowance.  My advice is just to make sure you backstitch the whole 1" seam for a little security when working the crochet stitches.

Initially, I did try joining them at an angle like you do with binding, but this rug isn't a precision thing, so straight seams aren't going to be an issue, and they're much quicker than the angled ones!   When I'm coming to the end of a roll while crocheting, I can just stitch the end of the last strip to the starter strip of a new roll (unless I want to join as you would normal yarn and bury the tail ends as I go).  Not much to it all really.

Back in April I had a whole bin full of 1" strips to work through which suited that time but I wouldn't necessarily want to face them in this marathon way again.  If I trim the strips to 1" as I am tidying away other projects and sew them together a few every now and then my rolls could gather gradually.


So, there you have it, the beginning of my rag rug adventure.  Wish me well with the continuation of the pattern, I REALLY want this to work.

Thursday, 5 June 2014

Something new

There has been so much "old" stitching (ie catching up on WIPs and UFOs) going on here that it feels rather lovely to have sussed out a whole new project in the past week or so.

Colours are much nicer in real life.
With my crocheted chevron throw finished and no embroidery hiding in my sofa-side basket I am devoid of hand-stitching projects.  Well, I was, until I rooted out some yarn and started playing with colours.


I'm using the Attic 24 pattern for hexagons which works up pretty quickly for those centre circles and then just needs a little bit of forethought on colour combinations if you are going to use the join as you go method she refers to.  So far so good -


Of course, there are a ton of yarn ends to deal with (hiding behind there for purposes of a quick pic) but it will be worth it if it stays as pretty as this!

Not sure how big I'm going with this one.  No doubt it'll be a much longer term project, though I am hoping it might not be years!!


Sunday, 18 May 2014

Mixed bag!

Well, this week's stitching has been a bit of a mixed bag, mainly due to the tedium of unpicking my tragic medallion quilting.


Though it must be said that Fry's chocolate cream did help a little bit as those rows and rows of stitches had to be undone in a rescue bid.


When my eyes started crossing over unpicking white threads, I took a break and picked up my chevron crochet. The main body of this little throw is now finished - woohoo - but, I think it needs a simple border now just to tidy up the edges before I can truly call it a finish.  I'm waiting for one more ball of yarn to arrive and hopefully I can push this over the line in this FAL quarter.


I've also been piecing these grey and aqua retro butterfly blocks for my class with Just Jude Designs.  I missed class this week because hubby was speaking at an evening conference for work but I worked on my blocks anyway to keep up with the class schedule.  Missed my friends and the fun chatter though, hope hubby isn't working next week.


Eventually, all the nasty stitching was removed from the medallion top and on Friday I started my third attempt at quilting this medallion quilt.  I think that this quilt top is the elephant I will simply have to learn to eat piece by piece.


As you know, quilting is not my forte and is certainly my least favourite part of the quilt making process, but rather than balk in fear of ever getting it right, I am approaching this quilt one step at a time.  So, a little bit of star outlining and lots of quilting in the ditch has been the way to start over.


A bit more outlining of geese and stabilising of borders with ditch quilting yesterday morning and she is beginning to look a lot healthier than she was last week!


I know the top is hanging low in the picture, but you can see that the awful distortion of my second quilting attempt has been redeemed.  I need to tackle the tippecanoe border next, but I'm pleased to report that I am feeling a little less overwhelmed at the prospect than I was 10 days ago.

Little Spring Mandala, pattern by Made in K Town, measures 7" diameter


Finally, this morning I used the scrap ends of yarn from my chevron to make up this bright little sunshiney mandala.  This was really quick to crochet using this great tutorial (just note it's written in US crochet terms).  It's one of the mandala suggestions made by Lucy of Attic 24 for her Yarndale Mandala challenge, so soon it will be off to join the other pretties in this year's Yarndale displays. (If you are interested do check out Lucy's posts, but note she is looking for only ONE mandala per sender.)

Not too shabby a week all in all!

Monday, 10 February 2014

Pretty little things


I was a bit secretive about this fabric pull when I added it to my FAL Quarter 1 list last month because I had plans to transform them into birthday pressies for someone with a huge heart.


There was a third fabric tucked behind the others in the top pic and I used the patterns from Judith's frame purse workshop (that I had so much fun at) and used the Dear Stella spot to stitch up a purse lining.


The beautiful yellow geometric flowers became the frame purse outer.  Along with the Oval Elements in gold I used the flowers to stitch a wee neck scarf or bag tie (all neatly folded in the pic above).


 I popped some notecards and a wee crocheted rose brooch inside too as a wee surprise.

Making pretties for friends is the best kind of sewing, don't you think?

Wednesday, 15 May 2013

Le Challenge # 2 - Wings

Le Challenge


I've taken up Le Challenge again this month with a little bit more notice to myself than last month's eleventh hour decision!  So here's what I made for "wings" -


Little crochet butterfly magnets for my sewing room noticeboard.  They were stitched from this lovely tutorial if you are interested.

My sewing room is being prettified a little bit at a time with these challenges!

Wednesday, 6 March 2013

Snood Reveal!

Here's the reveal piccie for my crochet snood which I managed to finish last weekend.


This grainy rubbishy pic is the best of a bad bunch of me modelling my new neck warming garment.

Here's a better pic without my ugly mug -


Toasty loveliness!  And so good to have what was supposed to have been a Christmas hols project finally finished!


Monday, 14 January 2013

What kind of a word is "Snood"?

Forgive the pun but I just cannot get my head around the word "snood".  Surely there is a nicer word for these items than "snood"?  To be honest, I'm not sure I like "cowl" any better.

Looks white here, but is actually a lovely shade of pale silver grey.

Vocabulary aside, I think snoods are soooooo snuggly and cosy looking and that's what I was aiming for when just before Christmas I ordered some half price silver grey bamboo/wool mix.  I had great plans to create a beautiful, warm, softly draping snood while I sat with my family in festive bliss over the holidays.

Ummm, didn't quite work out that way and I'm doing my best to get back to it now so that said snood might have a chance of being worn before June, when I sincerely hope it will not be needed as I don sunglasses and factor 25 - livin' in hope, ladies!

Letting you in on a secret, I may also have spent a little Christmas money on some voile for an infinity scarf for my "spring wardrobe", but more on that when it arrives!!


Friday, 7 December 2012

Flakey Post

Sorry that these photos are so rubbish - but I'm posting them anyway as proof that I made them!
Amid the chaos of the past week I had a commission for snowflakes for the P7 craft table at the school Christmas coffee morning.  If you had listened very carefully you may have heard mutterings whilst crocheting late at night about having better things to do (like sleep), but I was simultaneously flattered that my son had confidence his mum could produce the goods.


Well, goods were produced but the quantity was more like a flurry than the blizzard he had in mind.  16  snowflakes were crocheted, starched and delivered for selling to unsuspecting parents and grannies.  Wonder how many I will have to buy back?


Sunday, 23 September 2012

Weekend Update


Nothing big going on around here this weekend on the sewing front but there are some bits and pieces I can share.

First up is this fabulous Bee Blessed Antique Tile quilt top - 


I've been piecing the donated blocks together for the Bee and I think it's so stunning.  Of course, I have a penchant for blue and white quilts so this is right up my street, but I think you'll agree that this block looks great as a quilt.  Thank you so much to all of you who contributed blocks - can you spot yours?  If you don't see yours here, fear not, we have a second Antique Tile top in aquas/blues coming along with the remaining blocks that were sent to us so if yours isn't here, it'll likely be in there in due course.

September brought a return to hours of my week spent waiting poolside during swim training so I've been picking up my crochet again and the chevrons now look like this - 


Would you believe me if I told you there's an hour's work in every chevron stripe?  (Maybe I'm just slow!) This is soft and snuggly, and some days too warm to be working up in a stuffy swimming pool, but I am really enjoying making my waiting time productive again.

Also this week I finally got around to making a zippy cosmetic purse requested by my mum some time ago - bad daughter!


She likes angels, so while the rest of you are having heart attacks over the country angels in brown, I am happy that she will be okay with it!

And, I have finally reached the end of the 572 pieces I've been cutting from shirt scraps for my son's Squares and Strips bed quilt!


What's more, clever me already has 22 of the 88 eventual blocks completed? See ...

Single square blocks

Is that cheating? In any case it means just 66 blocks left to make!

So what have you been up to this weekend?


Related Posts Plugin for WordPress, Blogger...