Showing posts with label Joel Dewberry. Show all posts

Thursday, 1 August 2013

Sampler Sum Up


Hooray!  I managed to sneak my MIL's Sampler Quilt finish in just as July ended and I have to say it's a relief to know it is now ready for her birthday later this month without any late night finishing sessions, well last minute ones anyway!


I think MIL should like this birthday quilt.  I enjoyed trying out different blocks for this sampler.  Though I think that now between this quilt and my hipBees sampler (yet to be finished) I have well and truly scratched my sampler itch.


I spent an "interesting" afternoon at the weekend trying to quilt in a spiral with a broken walking foot and a guide arm that I had to hold down with one finger.  I think I will have to save my pennies for a new walking foot very soon, not sure I could go through that again!!  But, perseverance paid off and actually it doesn't look too bad, especially now that it's been crinkled in the dryer.

Back soon to show you a few little bits and bobs I've been playing with.

Wednesday, 26 June 2013

Goings On ...

Feels like lately I'm either playing catch up with my sewing because there's little time available to indulge in needle and thread, or I'm playing catch up with blogging the things I actually do manage to sew!

Anyway, just so you know that this blog isn't all about showing you the beautiful blocks that other people make and send my way, here are some of the goings on around these here parts ...

Hoping the sun shines for the recipients of my gifts.

When the time came to start thinking about End of Term pressies (which I dread), I thought I'd make some more of the sunglasses pouches I made for my colleague who was heading off on her Australian adventure back in March.  So that's my wee stack of cases ready for Friday morning and a few left over for some July gifting too ;-)


I also managed to piece together the sampler blocks for my MIL's birthday quilt.  I wasn't entirely sure about using such a busy wee print for the sashing but, on the basis that I was trying to make best use of the fabric I had to hand, rather than having to order even more, I went ahead and gave it a go.  My honest opinion is that I would still want to choose carefully any sashing that's so patterned, but with these other fabrics from the same line, I think it worked out not too badly.  I adore the deeper pink of the dogwood border fabric and think it finishes the quilt top off nicely.  I'm going to have to push myself in July to get it basted, quilted and bound before the end of the month, but I am so glad I had the forethought to make the blocks well in advance!

It may be slow, but at least there's a little progress.


Monday, 6 May 2013

Last Two Blocks!


The last two blocks for my MIL's special birthday sampler quilt came from this book - one directly, one indirectly.

My first choice was this strip rail block -

Strip Rail Block

I felt that the quilt needed another square patterned block as there are quite a few with a star/triangular feel to them.  (Though ironically, its construction is from HSTs anyway.) I'm quite proud that I managed to get all those diagonal joins to line up - it definitely paid to take my time with this one!


The instructions worked a treat, though I changed it slightly so I was sewing two diagonal lines across the wrong side of the strip squares before cutting the triangles rather than sewing biased edge triangles together and making a horlicks of it.


Then, trying to decide which block should be my final addition to the quilt, I noticed this photo of a sampler quilt by Liz Parsons in the same book.  The centre block in the fourth row down caught my eye.  Unfortunately, the pattern for it doesn't seem to be in the book but it really wasn't that difficult to figure out the maths myself.


And, I am so glad I did because I really love this wee block and I loved making it.  I wish I knew what it is called, but for now I have affectionately called it "Four-lips" (because it looks to me like four little tulip quadrants).  If you happen to know what this block is actually called, please do let me know.

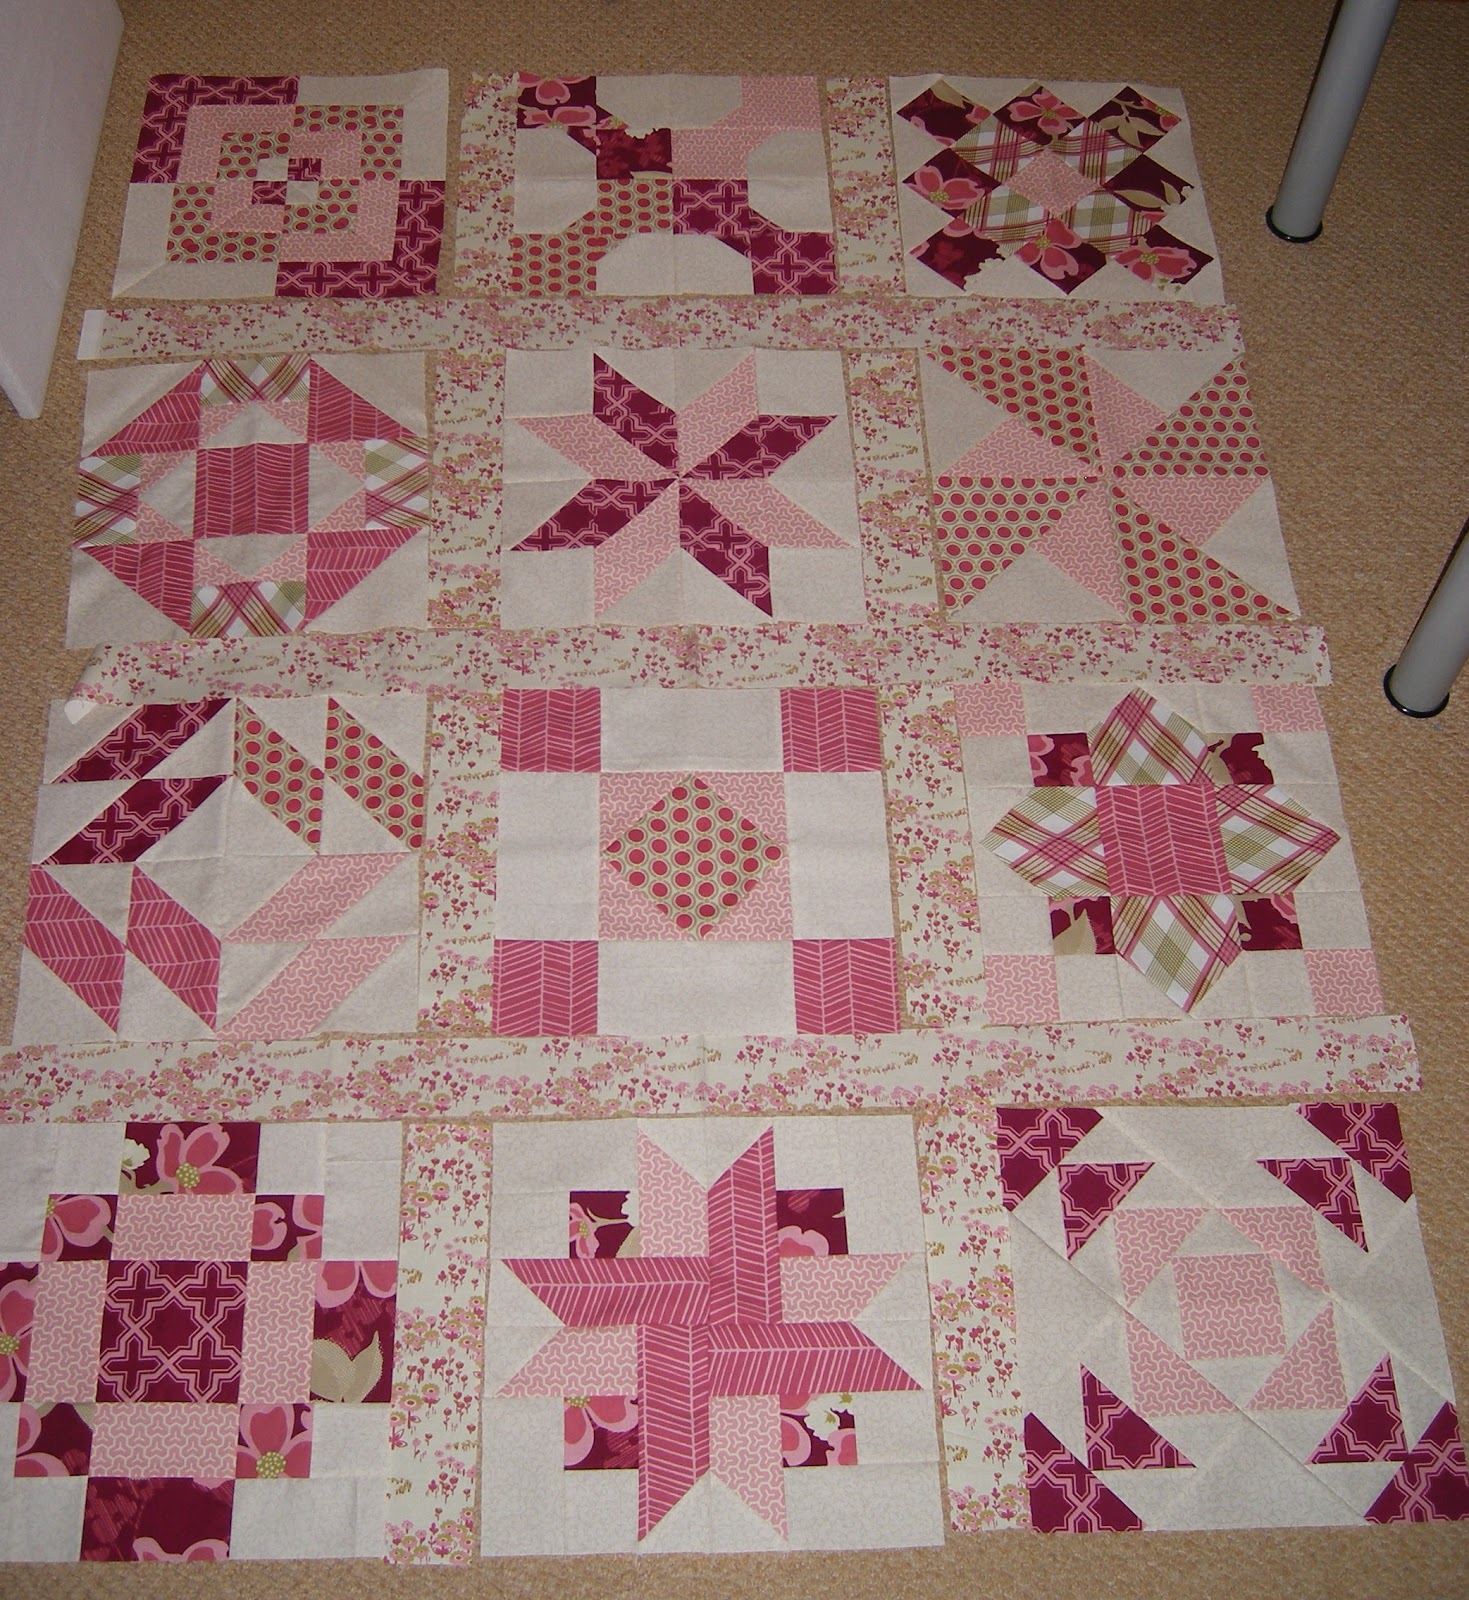
So, with all 12 blocks finished, I couldn't resist laying them out to see them all together - do you want a peep?  Do you?  Here you go ...


As you can see I even laid out the sashing (which you may remember I cut along with all the borders and binding before I started the blocks just to protect my fabric quantities).  It might take me a while to get used to this patterned sashing but I think it will look grand when it's all together properly.  There are lots of those blocks that I really am glad I tried and I do think my MIL will be pleased, which is the point after all!

Nice to feel like I am making progress at last!


PS Because I am a numpty and posted one post when I forgot I had this one scheduled for later in the day, you may have missed my earlier Sew Mama Sew Giveaway post - it's here if you don't want to miss out!

Tuesday, 9 April 2013

Sampler Blocks

With 8 blocks already stitched for my MILs birthday quilt, I am finding it increasingly difficult to decide which blocks should be next in my selection.  I'm not sure if it's just that there are so many to choose from, or if it's because I am looking at the finished blocks and trying to ensure that whatever I make next balances out the quilt.  Am I over thinking it?

Anyway, for my next two blocks I chose the Churn Dash Redux - tutorial by Jenna at Sew Happy Geek (really like this one)


 and the Rambler block from 501 Rotary Cut Blocks by Judy Hopkins.


My MIL has been in a rambling group for many years, so I thought including this one would add a little meaning to the quilt for her.  It looks lovely, but it was badly misbehaving in spite of me starching the life out of the fabrics.  It's finished a fraction under 12.5" and I think that the centre square has wonked a little but I'm going to hold on to it and hope that I will be able to make it work when the time comes to make up the quilt top.


I showed you this book before when I made the cushion for my MIL for Christmas and said I would show you the inside of the book, just in case you might be interested in it for yourselves.

I would not recommend this book for beginners as there are no written instructions beyond cutting measurements and diagrammatical construction drawings, but if you have some knowledge of patchwork blocks, then you should be able to follow the construction diagrams without any problems.


All of the blocks in the book are shown in colour diagrams at the front of the book in alphabetical order for ease of reference.


The block instructions are then listed in black and white diagrams with a very handy cutting measurements table which lists the cutting dimensions for various sizes (usually 6) of each finished block.  Really handy if you don't want to do the maths to downscale a block yourself.

There really are 501 traditional block patterns in this book, so it's reasonably good value for money if you like to have block patterns all in one resource.

So, 2 blocks this week means just 2 more to go - guess I'd better start checking out those 501 suggestions!

Tuesday, 8 January 2013

Planning Ahead


Before December I had a mini brainwave to make my MIL a cushion for Christmas and then follow that up with a quilt for a special birthday she has later this summer.  So, in the interests of not leaving this all to the last minute, I planned to make a start by finishing one quilt block this month, and hopefully follow that up with a few blocks each month. 

When I pulled out the fabrics we had set aside for the quilt (DS chose these for his Nanny), to be honest I wasn't sure where to start.  I dithered and dithered and then realised I was afraid to cut the wrong piece of fabric in case that left me short for borders and bindings etc.  So it seemed that a little bit of advance planning should be undertaken.


Borders and binding strips prepped and remaining fabrics are now game for block making.

I did some quick quilty maths and compared what I needed with the fabric quantities on hand.  Some zippy rotary cutting later, I have all the borders and binding ready before I even finished a block!  I know it seems a bit back to front, but I am so much happier knowing that my finishing fabrics are protected and I won't find myself needing to order more for borders and binding because I cut into something I shouldn't have for the sampler blocks.  (Watching the unnecessary fabric spend this year!)

Antique Tile block

So, with that lovely wee pile of available Modern Meadow fabrics I started with an Antique Tile block. We made these a few months ago for Bee Blessed and I think it's such a pretty block.  The Modify Tradition tutorial for the Antique Tile works like a dream too.  Highly recommend it if you fancy a go.  I made five of these in blue and whites for Bee Blessed and each time they were perfect.  Not so this time.  Not sure what I did, but there is a little inaccuracy in the lining up of this one.  Anyway, I'm adopting the "bigger picture" philosophy and reckoning that it's not so awful/obvious as to ruin the entire quilt.

Amish Diamond Block


I hadn't planned a second block for this quilt for January, but I got a little excited about being back in front of the sewing machine proper since feeling so unwell over Christmas, and I unearthed another tutorial I had spotted on the Modify Tradition site.  This one is the Amish Diamond block.  Doesn't it look great?  I am really happy with this little block and was surprised that it was so much easier than I had expected.  The centre of the block is the only "tricky" part really, but it's just like making a giant siggy block with two extra corners.  Once you have that sorted, the rest is wee buns!  Hey presto, a second pretty block for MIL's quilt.

Off to a sparkling start with this one.  Now I've got a few weeks to decide on another block or two for next month's additions!

Saturday, 1 December 2012

Pressie Planning

When it dawned on me that my MIL has a special birthday next summer, that she is so positive and encouraging about my sewing and that I haven't really made her anything substantial yet, a little thought occurred to me.

If I could make her a sampler quilt of her own for the special birthday then I could also precede it with a cushion that would match it for her Christmas pressie.  Two gifts decided in one little thought - result!

Hubby and son agreed with the plan. Lovely son helped me choose fabrics he thought Nanny would like

Modern Meadow and a taupe scroll co-ordinate.

and I did a little research for a nice block to make up into her cushion.


FYI - this book is a very handy resource for 501 different blocks.  It's not the most exciting book on the inside but it does come with handy tables for making the blocks in a number of different sizes and little block diagrams of how to assemble them. (Should try to take a pic of that for you next time.)

Grandmother's Choice block

Anyway, my son was very interested in the block designs and the names they had and he chose this one - Grandmother's Choice - because he liked the appropriateness of its name for his Nanny's Christmas pressie cushion.  The block wasn't too difficult to make even if I did have to unpick and rearrange a few pieces as I hadn't paid attention to the direction of the pink print (smart!).

After adding a wee border and basting, I tried (honestly I did) to FMQ in the block.  Three times I tried, but it was AWFUL with capital letters all the way through!  I just don't seem to be able to shift the fabric around smoothly and ended up with teeny weeny tight stitches and then great big jumpy ones.  On the basis that I need a finish this side of Christmas (!) I hung up my FMQ boots and opted for a little outline quilting.  I'm not madly happy with how this works but can't quite put my finger on why.  Possibly because I had the FMQ vision in my head and this is not it.  I don't know.


Anyway, we now have a pressie half way to completion.  If I'm very diligent tomorrow I'll be able to make the quilted envelope backing and check it off my "shopping" list - fingers crossed!


Tuesday, 9 October 2012

First Finish of October


All ready and waiting to head Down Under later this month.  This gift quilt began life as the hopscotch quilt and then somewhere along the line became this Joel Dewberry concoction which I think will be much more suited for its purpose.

I wasn't sure I was making the right choice on the binding for this one, but I'm glad I chose the argyle print in the end.  It finishes the quilt off nicely without demanding attention to itself which kind of lets the quilt top do the talking.

At least that's one under the belt for my Sew Many Plans.

Tuesday, 25 September 2012

Change of Plans

Always loving a good bargain, I have been keeping an eye out on sale prices for Joel Dewberry's Modern Meadow line and over the past year have collected this lovely little bundle.


Just perfect for the quilt which will replace my Hopscotch quilt which had been intended for my aunt.

I chose a block pieced from large sections so as not to chop up those bigger prints too much and I love them.


I used a white on white fabric (some of you are now feeling slightly queasy, I know) to add sashing and borders and I love how striking the blocks look against the brightness of the white.  In all honesty, while I am often partial to a white on white print, I probably would have preferred something else for this quilt.  But, as September seems to herald the arrival of every known invoice for fees - music lessons, swim club membership, school trip deposit and on and on and on - I had to work with what I already had, so w.o.w it was.

This quilt top feels fresh and clean and it makes me sigh with relief that I made a decision and got on with it.  I enjoyed this quick block and imagine more of these quilts in my future as a "go to" pattern when time is tight!

Must get basting ...

Related Posts Plugin for WordPress, Blogger...