Showing posts with label cushion. Show all posts

Monday, 17 August 2020

Triangles Cushion


I enjoyed piecing a second cushion for DS in July, especially as the HSTs were already pieced and trimmed.  They were the bonus offcuts HSTs from his university quilt.


I made him a cushion cover to go along with his quilt and to accompany him to Durham next month (sob, sob).


I love how the triangles work together in those colours - one of my all time favourite combinations.


All of that science/maths fabric on the front combined with the musical print from Aspen Frost on the back.  One way or another DS hopes to continue with both subjects areas next academic year.  It makes me happy to make for his big new adventure!

Friday, 14 August 2020

Drunken Curves Cushion


In between the Jelly Snowflake pattern releases I worked on some smaller projects.  This curvy cushion of drunkard's path blocks was one.  Originally, the colours were chosen for a decor plan in the house that we haven't moved in to.  DS had some lovely new bedding in mind and together we had figured out fabrics and a designee liked for a co-ordinating cushion for his bedroom.

I think he made a great design choice.  My drunkard's path piecing was refreshed by Leanne's brilliant video, which I was so glad is still on her blog.  Unfortunately, I think my trimming was little dodgy and so not everything matched up as well as I'd have liked but I decided to live with it as it's not the end of the world.


I found a perfect bright zingy yellow zip in my stash and then duly went and hid it behind a lovely zipper enclosure!


As always, my go to tutorial for this kind of backing is Just Jude's great tutorial.  I add a little lining into the backing as I go, but this tutorial never fails to get me neat results.


And hey presto, one grey and yellow drunken curves cushion!  Now all he needs is a newly decorated bedroom to put it!


Thursday, 7 February 2019

30s Repro Fabric Cushion


Recently, I was sorting the leftovers from the 30s repro fabric quilt I made last winter (above) and about the same time Sedef Imer's Scandi Throw Pillow tutorial popped up on Amy's blog. It seemed as good a prompt as any to make a co-ordinating cushion cover for the quilt.  (Any excuse, really.)


I chose to use 8 different fabrics in my cushion instead of 4 like Sedef's tutorial and I also enlarged the cushion to 18.5", so I was forced to do a little recalculating of the cutting but it worked out reasonably well, even if there are some rather large offcuts from this project.


It was really quite simple to stitch together after that, and you can see below that I didn't over complicate the quilting either.  In the ditches and 1" echoing for simplicity and speed.


Dolly seems to approve and I like the larger bold pieces of this cushion front.  They should work well with the chunky piecing of the quilt too.


Although this photo makes the backing dimensions look odd, they're not really.  Must be the angle I took the pic from.  This is my go to means of backing a cushion, courtesy of Judith's fab tutorial which is very easily upscaled from her 16.5" cushion dimensions.

Definitely scratched an itch with this project (saw a new tutorial and had to make) and used up more fabrics already in my possession.  All good!!

Tuesday, 1 March 2016

IRMA gets dressed up


I made this sweet little EPP Nosegay block at Fiona's class on last year's Stitch Gathering (Sept 2015) and decided that Saturday was the day to make it into something pretty and usable.


So Irma, one of those small cushion fillers that Ikea was selling for pence, got a sweet new cover to dress herself up.  The filler measures 14" square but is a little loosely filled for my liking.  I prefer my cushions well stuffed, so I reckoned if I made my cover quite a bit smaller that it would squish in and fill it up much better.


It worked.  Yay!  All pudgy and lovely at a finished 11.75" square.  (I made a 12.5" block and used a ⅜" seam to stitch around the cushion.)


A simple envelope back made this a speedy project, even if I did have to stretch out the actual stitching over 5 hrs between many, many interruptions.  It was one of those days.

Anyway, this little couch cushion is for Cutesy Tootsie to rest her crazy haired head on.


So, can you tell who sits where?  I'll help by telling you that the teenager's cushion is on his chair on the other side of the room as far away from his parents as he can sit if he must be in the same room as us fogies! ;-)


Wednesday, 23 April 2014

Hunter's Star Cushion

Two weeks without blogging and I feel like I've dropped into an abyss.  Almost as long without sewing and I was practically ready for medication!  Thank goodness for a sneaky afternoon at the machine on Monday.


The Hunter's Star pattern is one I have wanted to make since before I'd ever heard of blogging, so with new cushions required to brighten up my lounge, I decided a while back that I would finally tackle this pattern.  It can be pieced from templates but since I'm not very good at that I worked with paper piecing patterns I came across in my copy of Sylvia's Bridal Sampler from Elm Creek Quilts.

Those babies took a loooong time to piece.  Look how many seams there are in this 18" cushion front ...


I have to admit the seam intersections also affected the quilting making my needle hop around over the lumpier bumpier sections, which is why there's no close up pic of the loosely named 'in the ditch' quilting!

However, look at my happy little cushion!


Inordinate amount of time piecing just a cushion front, but so lovely to finally have a Hunter's star piece of my own, and this is a finish from my FAL Qtr 2 list as well!

Hope you all have enjoyed the Easter break!

Sunday, 27 October 2013

Disappearing Four Patch Cushion

The big question today is, why did I never try this before?

Reminds me of Opal Fruits (or Starburst for you young 'uns)

Seriously, how did I not realise that it was such a nice finish to conceal the zip in the cushion backing this way and quite straightforward to do?  What's even more terrible is that my great friend Judith has a fab tutorial showing exactly how it should be done and I have only just tried it for the first time this week!  Sometimes I am slow on the uptake, I tell you. I did line my backing but that bit was easy peasy to add to Judith's lovely clear instructions.


 So, here is the finished article.  A 24" disappearing four patch cushion.


Lightly handquilted in perle cottons.


Fabrics selected to tone in with a Scrumptious layer cake which will become a very simple quilt one of these days. I am just itching to get at it but better wait until there's a finish on my red and cream hipbees quilt - now there's motivation if ever I heard it!


So, here's what I learned on this project -

1. I really like the disappearing 4 patch (d4p) block.
2. I learned how to calculate fabric requirements the d4p block.
3. I think the d4p pattern looks much better in a larger quilt - the secondary patterns are distorted a little on the curve of the cushion which you don't get on the flat expanse of a quilt. And, of course, on a quilt you have more blocks to show off the pattern in.
4. Concealed zip backings aren't anywhere near as difficult as I thought.
5. Maybe it would have looked better if I'd finished it with binding rather than just sewing up and turning through.

All in all though, I'm happy enough with my experiment and even more thrilled that the colours work well with the Scrumptious fabrics.


PS If you have large scale print fabrics that you want to use but don't want to chop up into weeny pieces and lose the look, I think that a larger version of the disappearing four patch block would be ideal for showcasing them.

Saturday, 19 October 2013

More Like Magnus

I am beginning to feel the need to be a little more like Magnus Magnusson this week - "I've started so I'll finish". I seem to have made an alarming number of starts recently and I'm now feeling a little overwhelmed by the unfinished projects hanging around my sewing space.

But, in my best head in the sand approach today, I'm going to share another start with you anyway.

Karen's blocks for my hipBees quilt

Back in May, Karen sent me these lovely double four patch blocks for my month as Queen hipBee and ever since, I've been intrigued by the pattern possibilities.  Then, recently when I saw this beautiful quilt on Pinterest, I knew that this was a must do pattern for me.  Not quite having the capacity for a quilt of them just now, I've settled for making a 24" cushion cover instead.


I chose some lovely bright prints, paired them with kona snow and set to work.

Orange print block cutting didn't give quite the dimensions I was looking for on the smaller strips,
but the red one is much better.
I did have to experiment with the cutting a little to achieve the block I wanted but it didn't take much to get there in the end.

I set my blocks on my smallest cutting mat so I could turn the mat and not the fabric to make my cuts.

If you haven't seen a disappearing four patch block before it works by taking a regular four patch and making two cuts either side of each centre seam to create a nine patch.  You then just lift and switch the centre pieces of the top and bottom rows, and switch the first and last piece of the centre row to give you your new nine patch layout.  Stitch them together the regular way and hey presto, you have a disappearing four patch!  (Hope that made sense.)


By trial and error, I learned that with this block you will lose 0.75" in the seams on each quadrant of the four patch. So, in case you are interested in making some yourself, here's how to figure out what size squares to start with:

work out the unfinished size of your block - in my case 6.5"
divide it by 2 to find the unfinished block quadrant size - 6.5" / 2 = 3.25"
add 0.75" seam allowances - 3.25" + 0.75" = 4" starting squares

You could also go a little larger when making the blocks and simply trim them down if you are worried about accuracy.  Just remember to centre them well when trimming.

If you use this calculation method, please, please test it first rather than cutting an entire quilt's worth of blocks and then discovering my method didn't quite stack up.  I did try it for three different sizes of block and it worked a treat, but I am nervous to assure you that it's foolproof.


16 x 6.5" square disappearing four patch blocks
So, when you've done the easy peasy maths and whipped yourself up a stack of pretty blocks (and pressed a whack of seams, I must admit) you will have the fun of laying them out to stitch up into your project.


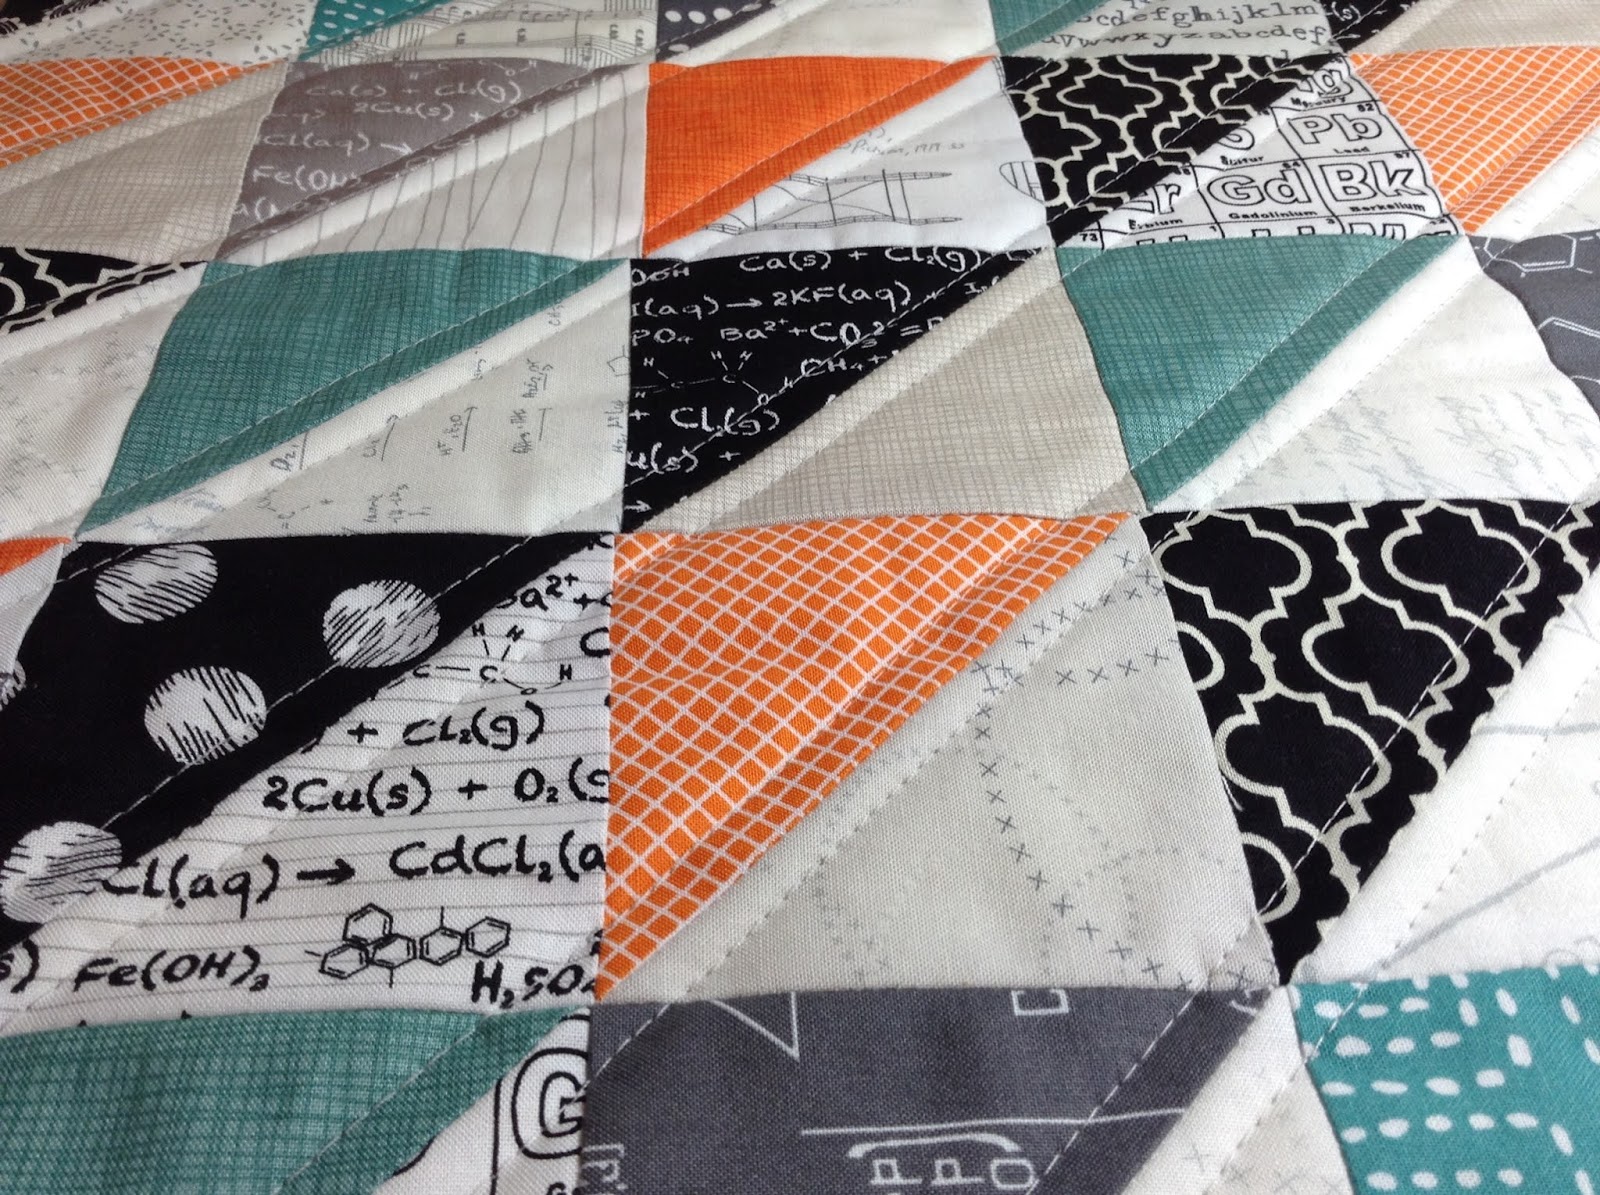
As you can see from this close up, my seams don't meet perfectly but I'm just going to ignore that bit this time.  What I love about the pattern is the secondary patterns and framings you get when the blocks are laid together.  In a bigger quilt the conjunction of the neutral solid corners could be a problem if you don't want loads of negative space in your quilt, but it also provides nice areas to perform quilting magic in.  It is these framed areas that appeal so much to me in this design - both the kona snow areas and the multi-colour four patches - but the best effect of the pattern is achieved from a distance I think, not close up.


The perle cottons practically jumped out of my box and begged to be used in the snow centres, so how can I resist?  Handquilting it shall be which will be very useful as a cushion finish in my living room and as a handquilting sample for another purpose in the new year. Eventually, it will be a win, win but for now, onto the "awaiting finishes" pile it goes!

See, all these starts and no finishes?  There are just too many beautiful, inspirational quilting designs around!  I think I need blinkers like the race horses wear to keep me focussed on just one thing at a time before I start to drive myself crazy!

Hmmm, perhaps next week I shall be better at channelling my inner Magnus.


PS For those not in the UK or more alarmingly, of a younger generation, who don't understand the reference to Magnus Magnusson - he was the host of the long running BBC quiz series Mastermind during my youth, and if the buzzer sounded when he was mid question he would say "I've started so I'll finish".

Tuesday, 27 August 2013

Holiday Stitching - 2

I promised to show you the other cushion I finished up while I was on holiday, so without further ado -

Circular portholes

We have a front and a back, or a back and a front depending on your preference.

Heart Porthole

I know that two useful cushions could have been made from these FQR porthole samples but realistically I don't have the space for two cushions and I wanted them to pretty up and make comfy my sewing chair.  A few rounds of simple borders and a hidden zipper and I have averted the all-too-easy phenomenon of samples being chucked in a drawer never to see the light of day again - feeling quite virtuous about that!

The portholes weren't the only FQR projects that I worked on over the hols too.  At the mid-point of our break my son discovered the joys of painting by numbers and commandeered the small table in the cottage we rented to create his masterpieces!  After that, my sewing machine didn't make any further appearances but it did "encourage" me to work on the embroidery I had started at the retreat.


I cannot tell you how much I enjoyed having time to play with new stitches I'd never tried before (lazy daisies and stem stitch).  Handstitching is so entirely therapeutic to me.  I'm sure there's some profound psychological explanation for it, but whatever it is I am really thankful for it's calming and restorative influences. Perhaps I should really be thanking the painting by numbers for providing the opportunity to get on with some, instead of grumbling under my breath about the plans that I didn't complete!

If anyone is interested in this little pattern, it's downloadable as a free pdf from nanaCompany here.  I have yet to decide what the embroidery should become - a cushion? a small wallhanging?  a pouch?  If you have any suggestions I'm happy to throw them into the mix.  For now, I'm just pleased that the embroidery worked out so nicely.

Come back tomorrow for my last holiday stitching post and I'll show you some work I did on new quilt tops (prior to loss of sewing table).


Monday, 26 August 2013

Holiday Stitching - 1


We returned from a lovely family holiday on Saturday night. Can you guess from our silly pic what our holiday purchases included?  Rain hats!  I refused to go all "Australian outback" with mine, but the men in my life are heading off to look for wild horses to break in for their daily commutes!

Our holiday time involves lots of adventure sports (this year: gorge scrambling, Go Ape highwire forest walking, rowing, lake swimming, mountain biking to name a few).  I can now set your mind at ease by confirming what you probably already suspected - I do NOT participate in said adventure sports. My role is to gleefully wave my men goodbye for a few hours and meet up with them for coffee and tourist activities later in the day.  While they live on adrenalin, I am free to stitch some peaceful hours away.

After stitching up the brooches (better pics than the previous post)


I had immense fun appliqueing hearts to some gorgeous Kaufman Essex Linen and embellishing it with a little lace and buttons, hoping to achieve a sort of pretty, vintagey look.


There was a lot of chalking grids and measuring to make sure everything lined up nicely.


I thoroughly enjoyed every minute of stitching this little cushion.  It was fun and freeing to just play with design and some notions.  I like the simplicity of it and hope that its recipient will too.

And, because I adored the print from the central heart, I used it on a contrasting band for the envelope backing. I think it might be from Denyse Schmidt's Shelburne Falls line, but didn't know that when I bought it.  I do know that I wish I had bought more of it!


So, this will be off to its new home soon, I hope.  And, hopefully tomorrow, I will show you the other cushion I made while I was away.

Related Posts Plugin for WordPress, Blogger...