Showing posts with label wonky crosses. Show all posts

Tuesday, 11 March 2014

Bee Blessed finish

I've been working on finishing off that Wonky Crosses quilt for Bee Blessed over the past week or so. The binding seemed to go on for ever!


I thought I would share a couple of finished pics with you since you were all so lovely consoling and commiserating with me over my spiral quilting trials.  In the end, the wibbles in the spirals have had the edge taken off by a good old tumble in the washer and dryer and it's not quite as bad as I thought.  I still would have preferred a smoother spiral but the quilt looks good nonetheless, I think.

the back

This quilt is intended for a gentleman recipient and we hope it will provide some comfort to him and his wife at a worrying health-related time.  Thank you to all of you who contributed wonky crosses blocks for us.

As an update to my questions re the guide bar on the quilting foot I have confirmed that the bar that came with my walking foot is indeed only intended for right of needle positioning.  It is however possible to purchase an additional arm (which extends to 4.5" wide if wanted) which can be positioned either left or right of the foot.  At another £13-15 on top of the £30 paid for the foot itself I'm not madly impressed but I probably will succumb at some point because I do love spiral quilting and really want to make it easier in future.  It's also very handy for other guided quilting too.


Wednesday, 26 February 2014

Spiralling Issues

I've been having some spiral quilting issues for the past few days.


Mainly because the new walking foot I had to buy to replace my broken one doesn't allow me to position the guide bar to the left of my needle.  In fairness, I'm not sure that the last one did either in an official sense, but I was able to manipulate it slightly and the guide would stay in place to the left meaning that the bulk of the quilt remained to the left throughout the process rather than having to be crammed, coerced and downright bullied through the not-terribly-large throat of my machine.


The result of the substantial manhandling of this Bee Blessed quilt is that the wonk of the crosses has now been joined by a significant wobble in the spiral.  It's very hard to keep the curve smooth when there's so much hauling going on.  This 70" square looks a little more like a wobbly puddle ripple than I had intended.  Fingers crossed that the washer and dryer will help improve the look before this quilt is passed on for donation.

So, clever peeps out there, I have a sneaky feeling that there must have been a way for me to quilt the spiral with the guide bar to the right of the needle without all of this heartache (shoulder ache and backache too).  Was I doing something wrong?  Could I have helped myself by doing something obvious?  I do have a tendency to make life difficult for myself at times but I started this quilt 6 times and I just cannot see here how I could have changed the process without changing the guide bar position.  Any ideas?  Does your guide bar work both left and right of the needle?  Is this just a quirk of my Janome model that the bar will only sit to the right?  Any helpful suggestions will be gratefully received because I do like to quilt in a spiral but would honestly not want to go through this 'right of the needle' process again!

Sorry if that got a bit technical.  Back to quilts.  

I've stitched up the hipBees concentric box blocks into a flimsy and I really like how it has come together -


Then, I worked on piecing a back from some fun fabric with a ziggy siggy panel down the middle.


So yep, that makes another one basted and ready for quilting - not a spiral though!


Tuesday, 17 September 2013

Giant Star Quilt


Jeni Baker's Vintage Star pattern was on my to do list for ages before I set to piecing the giant star whilst on my summer hols this year. I've been spending some time this past week quilting and binding this Bee Blessed quilt so that it doesn't migrate on to my UFO list accidentally. Here she is -


It was a very satisfying quilt top to make, and I really love the idea of enlarging block designs to make a dramatic quilt, perhaps more suitable for folks who mightn't be so keen on smaller, fussier patchwork. Hmmm, brain beginning to get ahead of me again ...


I also snuck in some more wonky crosses blocks for the man quilt - I'm loving the deep reds and yellows together.

Until next time ...

Wednesday, 31 July 2013

Bee Blessed Summer Block Reminder


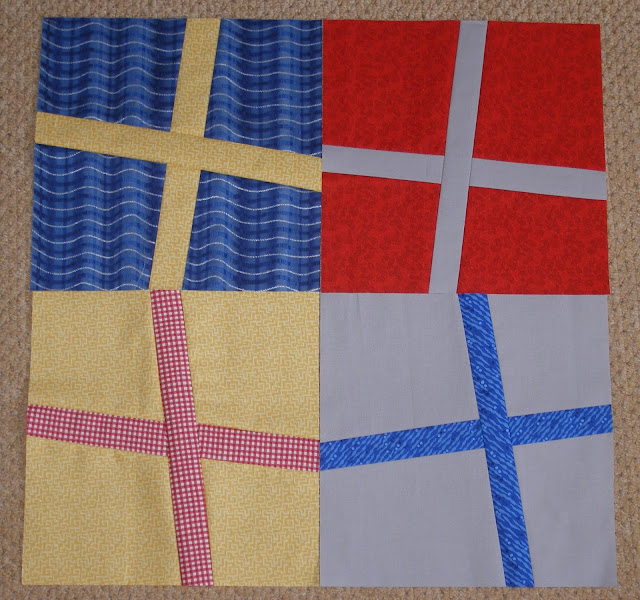
Four Wonky Crosses Blocks

Just a wee reminder that this summer's Bee Blessed blocks are wonky crosses block in red, blue, grey and yellow.  All the details were posted here if you missed them first time around.

And, to inspire you, here are some we have received already - I love how this is going to look.


Thanks for remembering us in your summer stitching plans!

Monday, 1 July 2013

Bee Blessed - Wonky Summer Blocks


Hello, all you lovelies out there!   While Bee Blessed is about to take a wee break from our Saturday gatherings over the summer, we know that many of you good folks like a wee something to work on over the quiet months, and it helps keep us busy when we get back together in September!

Four Wonky Cross Blocks

So, this July and August we would like to ask you to whip us up some lovely, simple wonky crosses blocks.  This time we are making blocks that are 10.5" unfinished and we're asking you to think "man fabric".  Not dark, sludgey colours but nice reds, blues, greys and even a touch of yellow too.  Here's the quilt that inspired our colour pallette if it helps.  This quilt is destined for a male recipient so please no flowers or girlie prints.  You can work in these colours and mix them up any way you like, though just two fabrics per block please.

Are you ready to join our summer wonking?  Here's a quick tutorial -


For a 10.5" unfinished block, you will need:
  • a 10.5" square of background fabric
  • 2 strips of a contrasting fabric approx 12" long and between 1.5" -2" wide (note that the more angled your cut is, the longer your strip will need to be)


All seams are scant 0.25".


1.  Take your 10.5" square of fabric and, using a rotary cutter and ruler, cut an angled line from top to bottom, dividing your fabric into two pieces.  (It can be good to have a variety of angles in a wonky crosses quilt so please feel free to cut your angles in a different direction to that pictured here.)


2.  Now stitch one of the contrasting strips to the left hand piece of your background fabric.  Press seams open.


3.  Remembering to offset a little to account for the angled seam, stitch the right hand piece of background fabric to the other side of your contrasting strip.  Press seams open.


4.  Now turn your block through 90 degrees and make another angled cut, just as before to divide the block into two pieces.


5.  Stitch the remaining contrasting strip to the left hand piece of the block in the same way as the first strip. Press the seams open.


6.  When stitching the right hand piece of the block to the contrasting strip carefully offset your fabric so that your bisected strips will line up when they are stitched together.  Press your final seam open.


7.  Take your block back to the cutting mat and carefully trim it to 10.5" square.  Eh voila!  One wonky cross block.  And now, you want to make another one, don't you?

Hope that you will find these blocks fun to make and not too taxing for the lazy summer days!

I would like to take this opportunity to thank you all for the support you give to Bee Blessed across all the months of our year.  Without all the fabulous blocks you contribute we would not be able to make as many quilts as we do to pass on to folks who need a little thoughtfulness and kindness.  As always, thank you for the enormous part you play in that, and we hope you will stick with us as Bee Blessed enters its third year from September!

Happy summer stitching!


Wednesday, 21 November 2012

Baby Quilt Finish

At the weekend I managed to complete the binding on the small wonky crosses quilt to bring it to a finish.  (Yay!)


This quilt was fun to make and to quilt.  The blocks aren't very complicated and don't take hours to piece but look very effective, I think.  Wouldn't these look lovely in Christmas fabrics - like lots of little parcels awaiting opening?

When I first posted this quilt I mentioned that I wanted to try some new (to me) quilting on this one.  My choice was to quilt straight lines edge to edge, randomly angled and intersecting across the quilt top.  I enjoyed this technique and think it worked well alongside the angles of the wonky crosses themselves.  There were more quilting lines than I expected to stitch somehow, and it would have been easy to keep going, adding more and more lines to try to fill in the unquilted areas.  At some point I had to decide that there were enough lines to hold everything together without over condensing the quilting in a particular area.  It looks okay, I think and I probably will try this again on other small quilts.

This one will hopefully be a blessing to a mum and baby via Bee Blessed donations.

Saturday, 10 November 2012

Two Tops Progress

My fun wonky cross blocks are now all stitched up and ready to be pieced into a little quilt top.


I have an idea for quilting this in a way I haven't tried before and can't wait to get it all basted and make a start.  Loving the colours and my departure from having white/cream solids in one of my quilts.

The green and grey wonky blocks that Judith and I were working on for a Bee Blessed quilt are now all sashed and bordered and looking very cool -


This quilt top is now ready for someone else in the group to work some magic on!


Related Posts Plugin for WordPress, Blogger...