Showing posts with label charm pack quilt. Show all posts

Tuesday, 6 April 2021

Spring Baby Quilts

Last month I got to play with a pretty spring fabric palette to stitch up two baby quilts for imminent arrivals.


For my cousin's baby I cut some charm squares from my stash and whipped up a Charm Pack Quilt.  You can find the details for this quilt here on an earlier post.  This is a great stash buster and given that I've not been doing much fabric shopping it was great to be able to use three different white on white prints from my stash for all the various borders because I didn't have a big enough piece in just a single print or solid.  I do love being able to raid my stash and still coming up with something pretty.


Believe it or not, I still haven't finished this one yet.  It's currently taken up residence on the back of a dining chair waiting for me to finish hand-stitching the last section of the binding.  So close!  I'll pop up a pic when I finally do get it over the line.


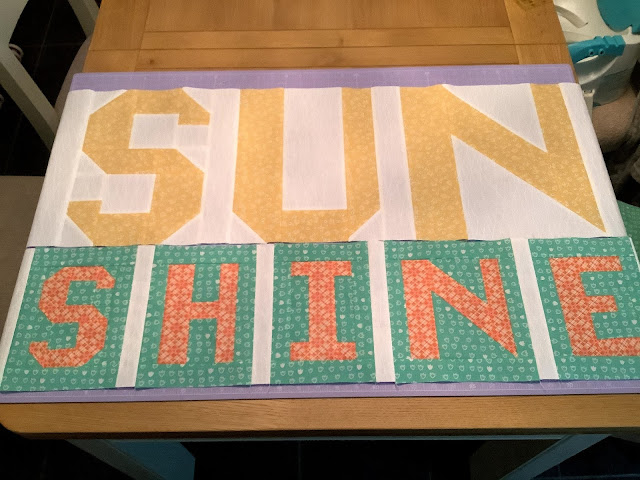
The other baby quilt is for someone who has made a BIG difference in Miss CT's little life.  Susan, CT's habilitation worker from Guide Dogs, is expecting (may even have had) her own first little bundle of joy.  I think everybody needs a Susan in their lives.  She is such a ray of sunshine and just what any family adapting to life with their child's visual impairment needs.  We have been so blessed to have her support for four years now, so I really wanted to make a special quilt as a way of thanking her at least a little for all she has done.  


Given that Susan is a complete ray of sunshine, what better quilt to make her new arrival than Lori Holt's 'You Are My Sunshine' quilt?  This is a pattern in Lori's Spelling Bee quilt and I'm delighted to have had a very lovely excuse to stitch it.  You can see it got some wavy line quilting treatment.  I'm not sure who was smiling more when I handed it over, me or Susan!!

So you see, it's not all cross-stitching around these parts.  It just looks that way ;-)


Sunday, 8 March 2015

Charm pack quilt

When I was sorting through my fabric last week I came across a charm pack of Kate Spain's Cuzco and had a sudden urge to put it to work.


I wanted to use every square and not chop them up into smaller pieces thereby losing potential size of a finished project. So I settled for a very simple layout for a small quilt/wallhanging.  All 42 charm squares were laid out as shown above and then I added three rounds of kona snow borders.


This pretty flimsy is the result of some nice, straightforward piecing.  Although this nighttime photo doesn't do them justice, I love the colours in this fabric collection, especially the lilacs and mint greens which remind me a lot of some of my favourite summer childhood clothes.


I opted to outline quilt each round 3/8" on either side of the seams and then finished it off with a perfectly co-ordinating piece of lavender flurry.


This little quilt finishes up at 38" x 42.5" which would be quite acceptable if you wanted a pretty wallhanging using your favourite fabric collection of charms or, if you needed a little quilt as a gift in a hurry it really doesn't take too long to make.  I will add a few measurements to help you out at the end of the post in case you fancy having a go yourself.  (ETA - I have now also got instructions for a Double Charm Pack Quilt here if you prefer something a little bigger.)


I raided my stash for more backing fabrics for this one and settled on some pale grey solid and soft yellow, both of which are in the Cuzco fabrics though probably not as obviously as the lilacs, green and blue tones of the main collection.  This was quite a satisfying quick make and if I had a spare charm pack lying around I would definitely be tempted to try this out again.

So, as promised here are a few pointers to help you stitch up a similar quilt if you take a notion to:

You need:
42 - 5" charm squares (Moda pre-cuts already contain all 42)
25" x FWOF of solid border fabrics
10" x FWOF for binding
backing and wadding - needs to be bigger than 38" x 42.5" (a few inches more than 1m of FWOF  fabric will be enough)


  1. Layout charms as shown in top picture of this post.
  2. Cut solid border fabrics into 4 strips of 2.75" x FWOF (for the two inner border rounds) width and 4 strips of 3.5" x FWOF (for the outer border rounds).
  3. From each 2.75" solid strip cut a 9.5" strip (for innermost border) and a 23" strip (for middle border). You will have 4 of each.  
  4. Stitch all of your rounds together using 0.25" seam and adding solid strips for each round to the sides first and then to the top and bottom of the quilt.
  5. When you come to the outer borders, use the 3.5" strips again adding to the sides first and then the top and bottom.  Trim the excess.
  6. Baste and quilt as desired.
  7. Cut 4 2.5" strips from your binding fabric to bind and finish quilt.


Hope this helps.


Related Posts Plugin for WordPress, Blogger...